Difference between revisions of "TESTING Zynthian UI Users Guide"
| Line 2: | Line 2: | ||
[[File:v5_render_zenital_mixer_leds.jpg|1024px|center]] | [[File:v5_render_zenital_mixer_leds.jpg|1024px|center]] | ||
| − | <div class="vall v5 | + | <div class="vall v5"> |
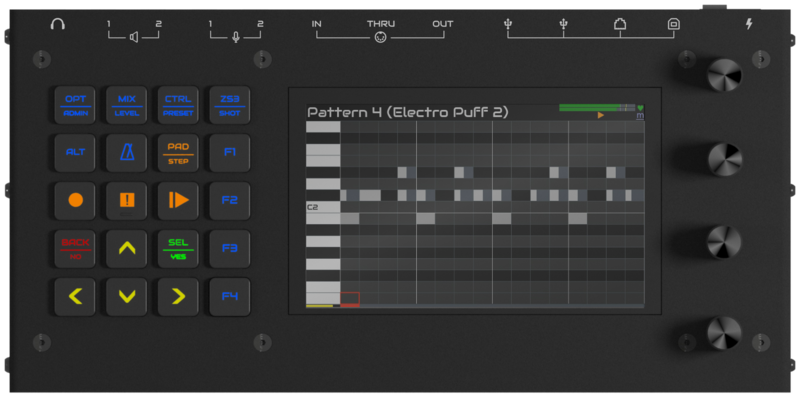
| − | The | + | The Zynthian V5 physical user interface is composed, from left to right, of: |
* '''5x4 push button grid with RGB-LED feedback''' | * '''5x4 push button grid with RGB-LED feedback''' | ||
| Line 10: | Line 10: | ||
* '''4 infinite knobs (rotary encoders) with push switches''' | * '''4 infinite knobs (rotary encoders) with push switches''' | ||
| − | This | + | This rich interface allows simple navigation and reduces the number of "clicks", which improves workflow and makes it faster and more intuitive. |
The 20 silicone push buttons and the 4 knobs with switches are the primary control mechanism to navigate the UI: | The 20 silicone push buttons and the 4 knobs with switches are the primary control mechanism to navigate the UI: | ||
| Line 24: | Line 24: | ||
</div> | </div> | ||
<div class="vall v4" style='display:none'> | <div class="vall v4" style='display:none'> | ||
| − | + | The Zynthian V4 physical user interface is composed of: | |
| + | |||
| + | * '''3.5 inch display with resistive touch''' | ||
| + | * '''4 infinite knobs (rotary encoders) with push switches''' | ||
| + | * '''4 push buttons''' | ||
| + | |||
| + | The 4 knobs with switches are the primary control mechanism to navigate the UI: | ||
| + | |||
| + | * '''accessing the different screens''' | ||
| + | * '''selecting options on menus and lists''' | ||
| + | * '''adjusting parameters''' | ||
| + | |||
| + | The 4 confgurable buttons provide fast access to more regularly used functions. | ||
</div> | </div> | ||
| − | + | There are 3 types of push actions that can be performed, depending on how long you hold down the button, knob or screen: | |
* '''short-push:''' Less than 0.3 seconds | * '''short-push:''' Less than 0.3 seconds | ||
| Line 34: | Line 46: | ||
<br clear=all> | <br clear=all> | ||
| + | <div class="vall v5"> | ||
{{NoteBox|Not all buttons have actions assigned to all three push types. You can change these timings from the [[Web_Configuration_User_Guide#User_Interface|webconf's UI tab]].}} | {{NoteBox|Not all buttons have actions assigned to all three push types. You can change these timings from the [[Web_Configuration_User_Guide#User_Interface|webconf's UI tab]].}} | ||
<br clear=all> | <br clear=all> | ||
| Line 41: | Line 54: | ||
* the big 5x4 silicone button grid, that adds 20 push buttons with RGB LED feedback. | * the big 5x4 silicone button grid, that adds 20 push buttons with RGB LED feedback. | ||
* as a consequence of the availability of more buttons, the 4 knobs are often used in quite a different way. | * as a consequence of the availability of more buttons, the 4 knobs are often used in quite a different way. | ||
| + | </dev> | ||
Let's start taking a closer look to this! | Let's start taking a closer look to this! | ||
Revision as of 14:13, 23 June 2024
1 General Concepts
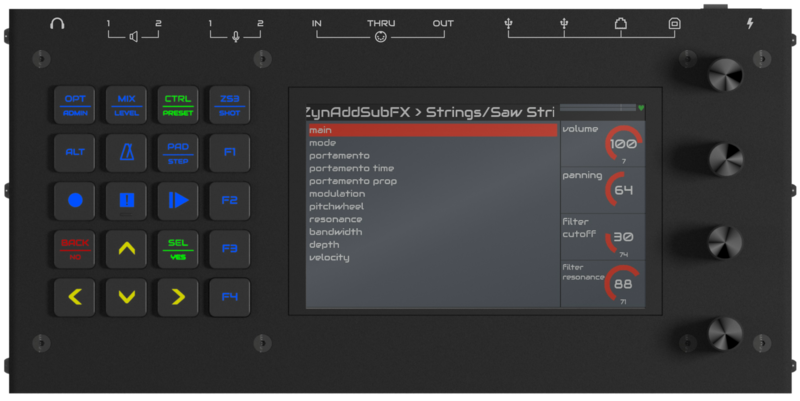
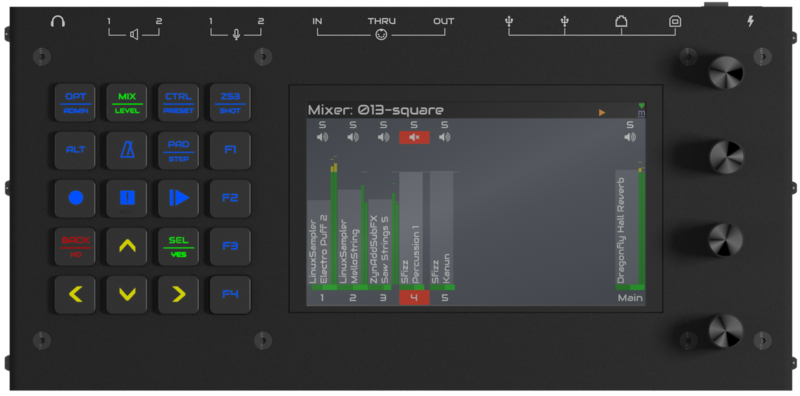
The Zynthian V5 physical user interface is composed, from left to right, of:
- 5x4 push button grid with RGB-LED feedback
- 5 inch display with capacitive touch
- 4 infinite knobs (rotary encoders) with push switches
This rich interface allows simple navigation and reduces the number of "clicks", which improves workflow and makes it faster and more intuitive.
The 20 silicone push buttons and the 4 knobs with switches are the primary control mechanism to navigate the UI:
- accessing the different screens
- selecting options on menus and lists
- adjusting parameters
Each push button is engraved with a text legend or icon and backlit with RGB LED that gives status feedback. The knobs are numbered from top to bottom, so the top one is knob#1 and the bottom one is knob#4. We will refer knobs in this way throughout this guide.
Most operations may be performed with the touchscreen but some may not be intuitive or easy to perform with it. On the other hand, some operations are specially optimized for using the touch screen. This will be detailed when explaining the different screens and workflows.
There are 3 types of push actions that can be performed, depending on how long you hold down the button, knob or screen:
- short-push: Less than 0.3 seconds
- bold-push: Between 0.3 and 2 seconds
- long-push: More than 2 seconds (until the long-action is triggered!)
Note:
Not all buttons have actions assigned to all three push types. You can change these timings from the webconf's UI tab.
The two main differences between the V5 UI and the classic zynthian UI are:
- the big 5x4 silicone button grid, that adds 20 push buttons with RGB LED feedback.
- as a consequence of the availability of more buttons, the 4 knobs are often used in quite a different way.
</dev>
Let's start taking a closer look to this!
1.1 The Title Bar
The title bar acts as a kind of breadcrumb. It normally shows the screen title or current chain information: MIDI channel, engine, bank & preset.
1.2 The Status Area
On the top-right corner, aside the title bar, is an area where some useful information is displayed in real time:
- Digital audio Peak Meter (DPM): horizontal bars indicating digital audio level and peaks
- Status Icons: indication of various zynthian states
Let's see the details:
1.2.1 Digital audio Peak Meter (DPM)
The DPM covers the range -50dBFS to 0dBFS, i.e. maximum permissible level at full scale (far right) down to 50dB below (far left):
- The green segment covers the range -50dBFS to -10dBFS.
- The yellow segment covers the range -10dBFS to -3dBFS.
- The red segment covers the range -3dBFS to 0dBFS.
There are independent meters for left and right channels which monitor the system output, i.e. the mix of audio that feeds the Zynthian output. Level decays with a logarithmic rule, taking one second to decay to -200dBFS so will decay to -50dBFS (the displayed range) in about quarter of a second. Peaks are displayed instantly, i.e. the attack of the meter is immediate (*). The peak hold bar remains for two seconds or until a higher peak is reached.
This meter is the same as the main mixbus DPM that is always visible in the mixer view and is therefore hidden when the audio mixer view is shown.
(*) Meter is updated 5 times per second so there can be 200 ms delay in peak being displayed.
1.2.2 The Status Icons
| 1st row: Health & Load | ||
|---|---|---|
| Cpu Load | Heart, indicating CPU load. It displays as green when under 50%, yellow when load is over 50% and red over 75%. | |
| Software update available | When a software update is available, the green recycle symbol is shown. You can update from the admin menu, webconf or terminal. | |
| XRun | It's shown when there are XRuns. This may be accompanied by clicks and pops on audio output. This means the CPU can't process or transfer audio fast enough and you should consider disabling some CPU-hungry option (like VNC, headphones, etc.) or reducing the complexity of your chains. | |
| Under-voltage | Zynthian is working in a degraded state, with the CPU frequency capped to 600-800 MHz, trying to stabilize the system and avoid a system crash. You shouldn't see that icon and if you do so, you should consider looking for a better power source. | |
| Over-temperature | Zynthian is working in a degraded state, with the CPU frequency capped to 600-800 MHz, trying to stabilize the system and avoid a system crash. You shouldn't see that icon and if you do so, you should improve heat dissipation (using a heat sink, etc.) | |
| 2nd row: MIDI activity & Playing/Recording | ||
| m | MIDI-IN | It's shown when MIDI messages are received. Underscore indicates system message such as MIDI clock. |
| Recording Audio | Audio is being recorded. | |
| Playing Audio | Audio track is being played. | |
| Recording MIDI | MIDI is being recorded. | |
| Playing MIDI | MIDI track is being played. | |
| Recording Pattern | A sequencer's pattern is being recorded. | |
| Playing Sequence | A sequence or pattern is being played. | |
2 The Zynthian UI Workflow
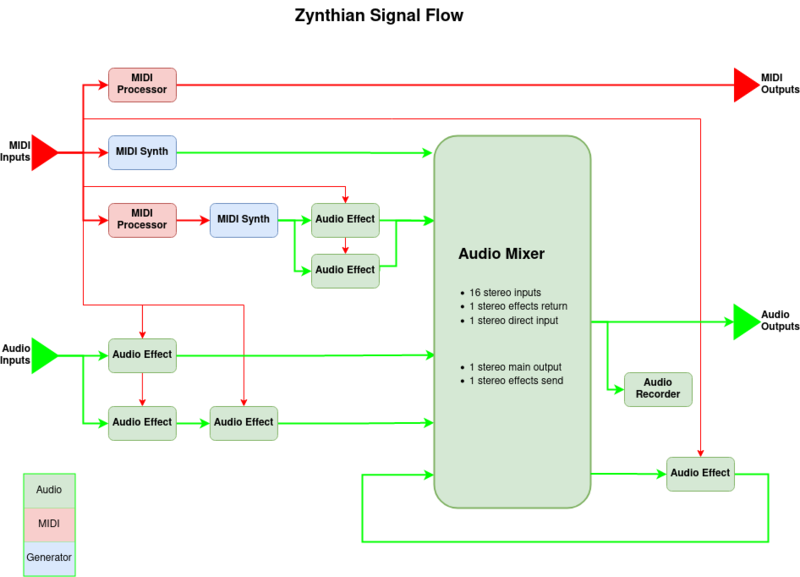
Zynthian workflow is based around chains of audio/MIDI generators & processors feeding an audio summing mixer.
2.1 Chains
Chains are a key concept of the Zynthian. The first thing you will do after powering-on your Zynthian is probably to create a chain. (It does little without any chains!)
A chain is composed of one or more interconnected blocks (processor slots), capable of generating or processing audio & MIDI. Each chain is normally assigned to a MIDI channel. These blocks are chained in the same order they are created, but you can change this order from the Chain Options menu. When a chain is created it is assigned a type:
- Synth Chain => Receives MIDI note-events and generate audio output. It must have a synth processor.
- Audio Chain => Receives audio-input and generates audio-output. It only has audio-FX processors.
- MIDI Chain => Receives MIDI-input and generates MIDI-output. It only has MIDI processors.
- MIDI + Audio Chain => Receives MIDI + Audio input and generates MIDI + Audio output. It has MIDI and audio-FX processors.
- Generator Chain => Generate audio output using an algorithm. The first processor is an audio generator.
- Special Chain => It can contains special processors, a MOD-UI pedalboard or a Pure Data patch. It can process audio and MIDI.
The chain's type can't be changed. Depending of the chain's type, MIDI processors can be added to the start of the chain and audio processors can be added to the end of the chain. Chain processors can be re-ordered and arranged as serial and / or parallel paths.
Synth, MIDI & MIDI+Audio chains have a MIDI channel assigned. MIDI channels are not exclusive. You can assign the same MIDI channel to several chains. MIDI and MIDI+Audio chains can receive all MIDI channels.
In MIDI+Audio chains, all audio processors in the chain receive all the MIDI events on the assigned channel (this should be improved!).
(*) If Master Channel is enabled, this is excluded from the MIDI channels available for chain assignment.
2.2 MIDI input
Each chain receive MIDI input from selected devices (keyboards and other MIDI controllers). You can configure the MIDI input devices from the chain's option menu. Use short-push to enable / disable the devices and bold-push to change the input mode. All input devices are selected by default when creating a new chain.
Each input device can work in 2 different modes:
- ACTI: only the active chain receives all MIDI input from the device and all MIDI events are translated to the active chain's MIDI channel. This is the default mode.
- MULTI: each chain receives MIDI from the input device using the controller's MIDI channel. No MIDI channel translation is done.
When using ACTI mode you don't need to worry about the MIDI channel your keyboard/controller is using. You change the instrument you play by changing the active chain in your Zynthian. You can change the active chain by simply rotating the select knob (#4) in the Mixer view or using the the left/right arrows.
On the other hand, MULTI mode allows receiving and managing separately every MIDI channel. Each MIDI controller will drive the chains assigned to the controller's MIDI channel. If you are using a MIDI controller that can sequence multiple tracks (Beatstep Pro, Keystep Pro, Novation Circuit, etc.) then you will generally want to use this mode.
Note that MIDI CC (Continuous Controllers) events are handled differently and they are not routed to chains. See section on MIDI Learning & binding.
3 Using the push buttons
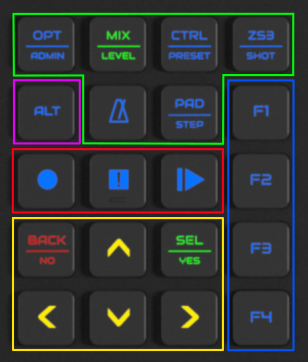
The push buttons grid is divided in 5 groups:
3.1 Screen access buttons
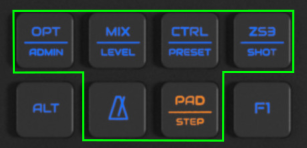
Screen access buttons are outlined on green in the image. Most of these buttons have 2 different functions assigned to them, with a horizontal line separating the two function labels. The primary function is printed at the top and the secondary function is printed at the bottom. The "metronome" button is the exception to this and has a single function assigned to it. Well, not exactly, as it's the Tap-Tempo button too (try it!).
LED color depends on current selection:
- when the primary function is selected, the button lights green.
- when the secondary function is selected, the button lights orange.
- when none of the button's functions are selected, the button lights blue.
A short-push on the button will:
- select primary function, when none of the button's functions is selected
- select secondary function, when button's primary function is selected
A bold-push on the button will always access the secondary function, not matter what is currently selected.
For instance, if you are in the mixer screen and short-push the OPT/ADMIN button, the Chain menu will be opened. If you short-push it again, the Admin menu will be opened. Then, if you bold-push the MIX/LEVEL button, the Audio Levels screen will be opened. You click "metronome" button and the Tempo screen will be opened. If you tap-it several times, tempo will be adjusted, e.g. tap twice per second to set tempo to 120BPM.
Screen access buttons are, from left to right and top to bottom:
- OPT/ADMIN
- Options or Menu: Contextual. Click several times to reach the main menu.
- Admin menu
- MIX/LEVEL
- Mixer
- Audio Levels
- CTRL/PRESET
- Chain Control (Instrument)
- Preset/Bank
- ZS3/SNAPSHOT
- SubSnapShots (ZS3s)
- Snapshots
- METRONOME
- Tempo screen / Tap-Tempo
- PAD/STEP
- Scene (ZynPad)
- Pattern
- Arranger => Keep pressed to open!
Some buttons have a tertiary function assigned to long-push:
- OPT/ADMIN => Long-push to power off.
- CTRL/PRESET => Long-push to enter/leave preset favorites
- PAD/STEP => Long-push to access Arranger
3.2 ALT button
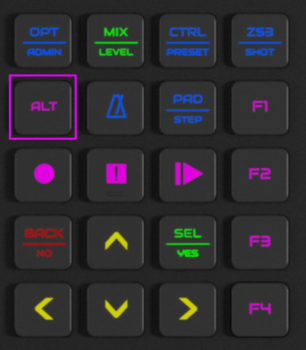
The ALT button toggles the alternate function mode. When you click it, ALT button and buttons having an alternate function will change their default color from blue to purple. Currently only transport and custom buttons (F1-F4) have alternate function:
- Transport buttons will toggle between Audio Player/Recorder (normal) and MIDI Player/Recorder (alternate).
- Customizable F1-F4 buttons will toggle between Program Change 1-4 (normal) and Program Change 5-8 (alternate), so you can use it for easily learning and recalling up to 8 subsnapshots (ZS3s).
3.3 Transport buttons
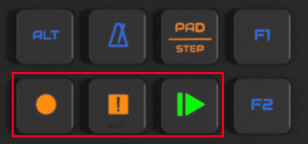
By default, transport buttons control the global audio recorder/player and default color is blue. When "ALT" button is pushed (ALT mode enabled), transport buttons control the MIDI recorder/player and default color is purple.
- short-push the record button (solid circle) to start/stop a recording. When a recording is in progress, the record button lights red and you should also see the rec icon in the display status area, at top-right.
- short-push the play button (solid triangle) to play/pause the currently selected track. The last recorded track is selected by default. When a track is being played, the play button lights green. After pausing, pushing again will resume the playing in the point it was paused.
- bold-push the play button to open the track list. After selecting a track, the audio player control screen will be shown.
- short-push the stop button (solid square) to stop playing a track and rewind. Pushing play again will start playing from the beginning.
- bold-push the stop button to stop all sounds, including any audio/midi track and sequences.
In some screens, transport buttons have specific (contextual) functionality. When this happens, they will light orange to help you to remember their normal behaviour is altered. The screens that have specific transport functionality are:
Pattern editor screen
From pattern editor screen, transport buttons are used to control pattern recording/playing. Note that for recording a pattern, you may want to start playing before recording, so notes are captured live in the time grid. If not, notes are captured step by step. While recording, pressing the back button may be used to undo the last recording.
Audio-player chain
From the control screen of an audio-player chain, transport buttons are used to control recording/playing of the chain's audio-player (instead of global audio-player).
From all other screens, transport buttons behave normally as explained above, controlling global audio recorder/player or MIDI recorder/player (ALT mode).
Navigation buttons are used for basic navigation:
- Up/Down arrow buttons:
- Browsing lists and menus.
- Moving cursor (selected item) vertically in pattern editor, zynpad, etc.
- Left/Right arrow buttons:
- Selecting active chain in audio mixer and control screen.
- Moving cursor (selected item) horizontally in pattern editor, zynpad, etc.
- Select/Yes button:
- Selecting items in lists and menus.
- Entering select mode in control screen for browsing controller pages.
- Adding/removing notes in pattern editor.
- Playing/Stopping sequences in zynpad.
- Answering "Yes" in confirmation dialogs.
- Back/No button:
- Closing current screen, returning to previous screen.
- Answering "No" in confirmation dialogs.
Note:
When not in the control screen, knob#4 acts as the select knob similar to the classic V1-V4 UI. Rotate to browse lists and move the cursor horizontally in grids (zynpad, pattern editor, etc.). Push to select items, same than SELECT button. Knob#3 can be used to move the cursor vertically in grids (zynpad, pattern editor, etc.).
3.5 Custom function buttons (F1-F4)
These buttons are considered to be customizable buttons, e.g. if you want direct access to other screens, etc. you may reconfigure these buttons using the webconf's wiring layout tab.
As explained above, while describing the ALT-mode, these buttons are assigned by default to MIDI Program Change messages:
- Normal mode: Program Change 1-4
- ALT mode: Program Change 5-8
This default configuration is fine for learning/recalling subsnapshots (ZS3) and you may find this really useful if you use your zynthian as a keyboard expander.
Note:
Although all buttons and switches are fully configurable from the webconf tool (hardware->wiring->advanced), this guide refers to the official V5 profile configuration, that matches printed button legends. Of course, you are very welcome to experiment with button assignment and try different configurations. In fact, if you reach a sweet point, we may be able to produce an alternative keypad with custom printings. Simply contact us at the zynthian forum!
4 Using the knobs
The V5 knobs behave quite differently to V1-V4 knobs. Because of the 20 silicone buttons, there is no need to use the knobs' switches to navigate the UI which now is best achieved with the push buttons, so when appropriate, knobs' switches have been mapped to drive the MIDI learning functionality, which is quite intuitive. The knobs are numbered from top to bottom, so the top one is knob#1 and the bottom one is knob#4. We will refer knobs in this way throughout this guide.
4.1 General rule
Although knob's functionality is contextual in V5, there is a kind of pattern that can serve as a general rule and applies to many screens:
- Knob#4 acts as the select knob similar to the classic V1-V4 UI.
- rotate to browse lists and move the cursor horizontally in grids (zynpad, pattern editor, etc.).
- short-push to select items, same than the SELECT button.
- Knob#3
- Rotate to move the cursor vertically in grids (zynpad, pattern editor, etc.).
Note:
MAIN Volume is allways available with one click, push MIX button and Knob#3 rotate is used to change the MAIN volume.
4.2 Chain Control (Instrument)
- Knob#1 - #4
- rotate any knob to change the value of the assigned parameter, same as the classic UI. This has not changed.
- short-push any knob to start MIDI-learning for the associated parameter. Move a knob/fader in your MIDI controller end the learn. Push back to cancel.
- bold-push any knob to open the options menu for the associated parameter.
Note:
To navigate the controller screens (select mode), you must push the SEL button. Bold-pushing knob#4 doesn't work anymore for this.
4.3 Mixer
- Knob#4
- rotate to select active chain.
- short-push to open the control screen of the selected chain.
- bold-push to open the options menu of the selected chain.
- Knob#3
- rotate to change the MAIN volume.
- short-push / bold-push to open the Mixer's MIDI learning menu.
- Knob#2
- rotate to change the pan / balance of the selected chain.
- short-push to mute the selected chain.
- Knob#1
- rotate' to change the volume of the selected chain.
- short-push' to solo the selected chain.
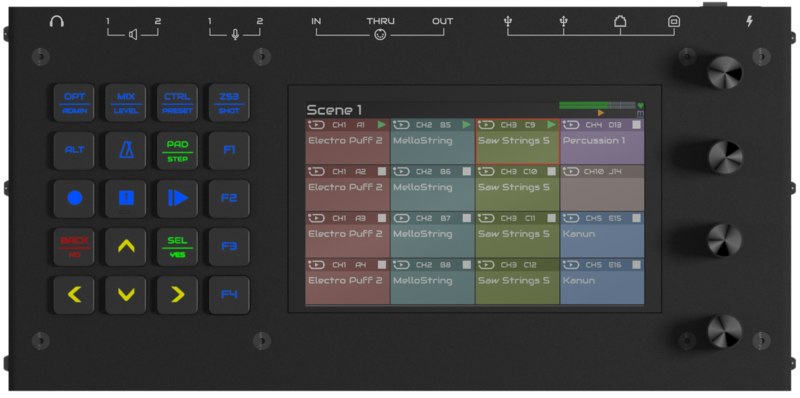
4.4 Scene (ZynPad)
- Knob#4
- rotate to move cursor horizontally.
- short-push to play/stop the selected sequence.
- bold-push to open the pattern editor for the selected sequence.
- Knob#3
- rotate to move cursor vertically.
- short-push to MIDI-learn the current pad by pushing a note in your MIDI controller.
- Knob#2
- rotate to change the scene.
- Knob#1
- rotate to adjust tempo BPM.
Note:
Before MIDI-learning pads, you have to select a trigger device. Push OPT to access the zynpad menu and choose your trigger device. Note that if the selected device is already supported (have a driver!), MIDI-learning is not needed at all and the device will be mapped automatically.
4.5 Pattern
- Knob#4
- rotate to move cursor horizontally.
- short-push to add/remove a note at cursor position.
- bold-push to edit note parameters:
- rotate knob#4 to select the parameter to edit
- duration
- velocity
- stutter count
- stutter duration
- rotate knob#3 to change coarse value.
- rotate knob#2 to change fine value (when available).
- short-push knob#4 to end editing
- bold-push knob#4 again to enter EDIT ALL mode
- rotate knob#4 to select the parameter to edit
- Knob#3
- rotate to move cursor vertically.
- Knob#2
- rotate to change the pattern to edit.
- Knob#1
- rotate to adjust tempo BPM.
Note:
Bold-push in an empty position to edit the default note parameters. These are the values used when adding new notes.
5 The UI Screens
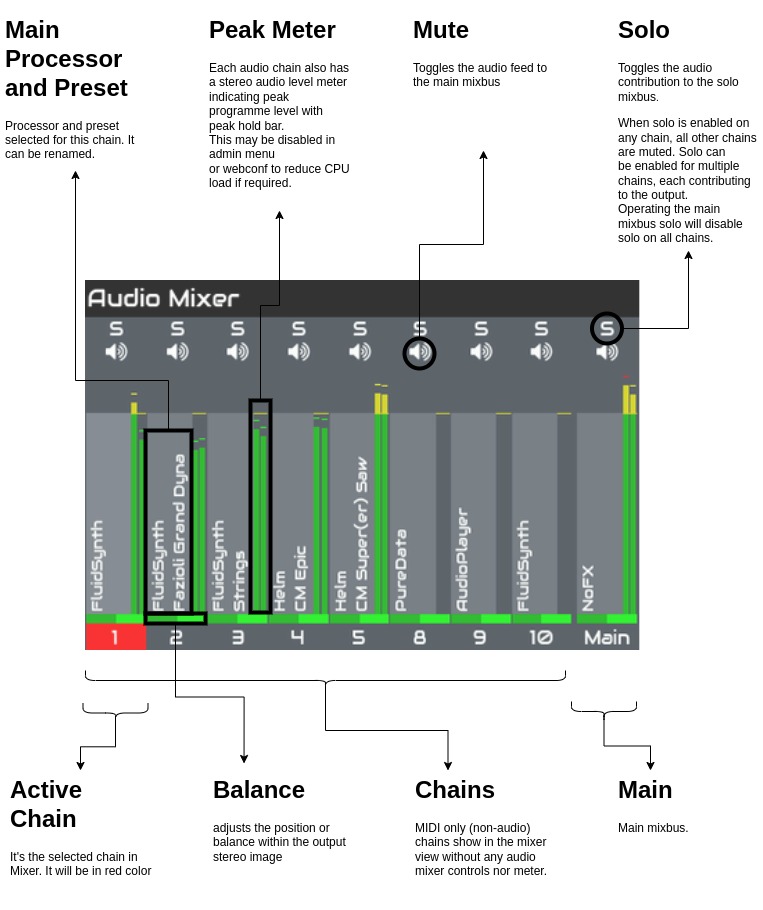
5.1 Mixer
6 Learning Pills
6.1 Basics
- Creating a synth chain and adding a MIDI chorder + audio FXs (tutorial)
- Creating a synth chain (workflow capture)
- Creating another synth chain (alternate workflow capture)
- Audio Mixer (workflow capture)
- Banks & Presets
- Chain Control
- Chain Options
- Chain FXs
- MIDI-learning: sound engine parameters
- MIDI-learning: audio mixer
- MIDI-learning: ZS3s (Zynthian SubSnapShots)
- Audio Recording
- MIDI Recording
6.2 Sequencer
- Pattern Editor: Creating & Editing patterns
- ZynPad: Launching patterns
- Audio Player: Loops & One-shots
- Arranger: Linear composing
6.3 Mini-HowTos
- MIDI Clone: Make 2 chains to play unison
- Arppeggiator & Chorder
- SooperLooper: Live audio looping
6.4 Contribute your workflow captures
This collection of workflow animations have been recorded with the "capture workflow" option from UI's admin menu and subtitled later with the webconf tool:
library->captures->log
With this tools, you can also capture, subtitle and share your favorite workflows, helping others to learn and contributing to improve zynthian documentation. If you do so, please, share your workflows in the forum:
https://discourse.zynthian.org
7 Work In Progress
This V5 documentation is a work in progress and it will be improved during the next weeks/months. Meanwhile, you could find very useful to consult:

