Difference between revisions of "Zynthian UI User Guide - V5"
| Line 43: | Line 43: | ||
<br clear=all> | <br clear=all> | ||
| − | |||
[[File:v5_buttons_outlined.png|400px|right]] | [[File:v5_buttons_outlined.png|400px|right]] | ||
| Line 116: | Line 115: | ||
In some screens, transport buttons have specific (contextual) functionality. When this happens, they will shine in orange to help you to remember their normal behaviour is altered. The screens that have specific transport functionality are: | In some screens, transport buttons have specific (contextual) functionality. When this happens, they will shine in orange to help you to remember their normal behaviour is altered. The screens that have specific transport functionality are: | ||
| + | |||
| + | <br clear=all> | ||
| + | [[File:v5_buttons_outlined-3-detail.png|400px|right]] | ||
* '''Pattern editor screen''' | * '''Pattern editor screen''' | ||
Revision as of 11:26, 29 July 2023
1 General Concepts
The zynthian V5 physical user interface is composed, from left to right, of:
- 5x4 push button grid with RGB-LED feedback
- 5 inch display with capacitive touch
- 4 infinite knobs (rotary encoders) with switches
This richer interface allows to simplify navigation and reduce the number of "clicks", what improves workflow and makes it faster and more intuitive.
The 20 silicone push buttons and the 4 knobs with switches are the primary control mechanism to navigate the UI:
- accessing the different screens
- selecting options on menus and lists
- adjusting parameters
Most operations may be performed with the touchscreen but some may not be intuitive or easy to perform with it. In the other hand, some operations are specially optimized for using the touch screen. This will be detailed when explaining the different screens and workflows.
Like the classic UI, there are 3 types of push actions that can be performed, depending on how long you hold down the button (or knob):
- short-push: Less than 0.3 seconds
- bold-push: Between 0.3 and 2 seconds
- long-push: More than 2 seconds (until the long-action is triggered!)
Note:
Please, note that not all buttons have assigned all of them. Also note you can change these timings from the webconf's UI tab.
The two main differences between the V5 UI and the classic zynthian UI are:
- the big 5x4 silicone button grid, that adds 20 push buttons with RGB LED feedback, allowing huge improvements in usability.
- as a consequence, the 4 knob switches now are used in quite a different way.
Let's start taking a closer look to this!
2 Using the push buttons
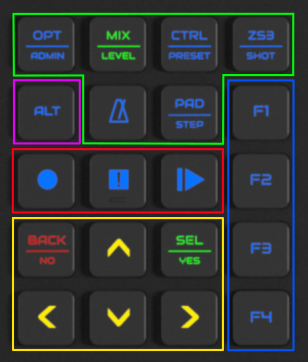
The push buttons grid is divided in 5 groups:
2.1 Screen access buttons
Screen access buttons are outlined on green in the image. Most of these buttons have 2 different functions assigned to them, with a printed line in the middle. The primary function is printed at the top and the secondary function is printed at the bottom. The "metronome" button is the exception to all this and have a single function assigned to it. Well, not exactly, as it's the Tap-Tempo button too (try it!).
Led color depends of current selection:
- when the primary function is selected, the button shines on green.
- when the secondary function is selected, the button shines on orange.
- when none of the button's functions is selected, the button shines on blue.
A short-push on the button will:
- select primary function, when none of the button's functions is selected
- select secondary function, when button's primary function is selected
A bold-push on the button will always access the secondary function, not matter what is currently selected.
For instance, if you are in the mixer screen and short-push the OPT/ADMIN button, the Chain menu will be open. If you short-push it again, the Admin menu will be open. Then, if you bold-push the MIX/LEVEL button, the Audio Levels screen will be open. You click "metronome" button and the Tempo screen will be open. If you tap-it several times, twice a second, tempo will be adjusted to the given 120 BPM.
Screen access buttons are, from left to right and up to down:
- OPT/ADMIN
- Options or Menu: Contextual. Click several times to reach the main menu.
- Admin menu
- MIX/LEVEL
- Audio Mixer screen
- Audio Levels screen
- CTRL/PRESET
- Control screen
- Presets/Banks screen
- ZS3/SNAPSHOT
- SubSnapShots management
- Snapshot management
- METRONOME
- Tempo screen / Tap-Tempo
- PAD/STEP
- ZynPad screen
- Pattern editor
Some buttons have a tertiary function assigned to long-push:
- OPT/ADMIN => Long-push to power off!
- CTRL/PRESET => Long-push to enter/leave preset favorites
- PAD/STEP => Long-push to access arranger screen
2.2 ALT button
The ALT button toggles the alternate function mode. When you click it, ALT button and buttons having an alternate function will change their default color from blue to purple. Currently only transport and custom buttons (F1-F4) have alternate function:
- Transport buttons will toggle between Audio Player/Recorder (normal) and MIDI Player/Recorder (alternate).
- Customizable F1-F4 buttons will toggle between Program Change 1-4 (normal) and Program Change 5-8 (alternate), so you can use it for easily learning and recalling up to 8 subsnapshots (ZS3s).
2.3 Transport buttons
By default, transport buttons control the global audio recorder/player and default color is blue. When "ALT" button is pushed (ALT mode enabled), transport buttons control the MIDI recorder/player and default color is purple.
- short-push the record button (solid circle) to start/stop a recording. When a recording is in progress, the record button shines in red and you should also see the rec icon in the display status area, at top-right.
- short-push the play button (solid triangle) to play/pause the currently selected track. The last recorded track is selected by default. When a track is being played, the play button shines in green. After pausing, pushing again will resume the playing in the point it was paused.
- bold-push the play button to open the track list. After selecting a track, the audio player control screen will be shown.
- short-push the stop button (solid square) to stop playing a track and rewind. Pushing play again will start playing from the beginning.
- bold-push the stop button to stop all sounds, including any audio/midi track and sequences.
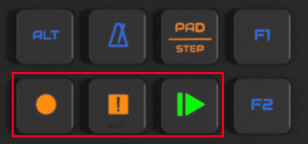
In some screens, transport buttons have specific (contextual) functionality. When this happens, they will shine in orange to help you to remember their normal behaviour is altered. The screens that have specific transport functionality are:
- Pattern editor screen
From pattern editor screen, transport buttons are used to control pattern recording/playing. Note that for recording a pattern, you may want to start playing before, so notes are captured in the time grid. If not, notes are captured step by step. While recording, back button can be used for undoing last recording.
- Audio-player chain
From the control screen of an audio-player chain, transport buttons are used to control recording/playing of the chain's audio-player (instead of global audio-player).
From all the rest of screens, transport buttons will behave normally as explained above, controlling global audio recorder/player or MIDI recorder/player (ALT mode).
Navigation buttons are used for basic navigation:
- Up/Down arrow buttons:
- Browsing lists and menus.
- Moving cursor (selected item) vertically in pattern editor, zynpad, etc.
- Left/Right arrow buttons:
- Selecting active chain in audio mixer and control screen.
- Moving cursor (selected item) horizontally in pattern editor, zynpad, etc.
- Select/Yes button:
- Selecting items in lists and menus.
- Entering select mode in control screen for browsing controller pages.
- Adding/removing notes in pattern editor.
- Playing/Stopping sequences in zynpad.
- Answering "Yes" in confirmation dialogs.
- Back/No button:
- Closing current screen, returning to previous screen.
- Answering "No" in confirmation dialogs.
The 4th knob can also be used for browsing lists and moving the cursor or changing the selected item horizontally. Short-pushing it can be used, most of times, for selecting. The 3rd knob can be used for moving the cursor vertically.
2.5 Custom function buttons (F1-F4)
These buttons are though to be customizable buttons, so if you need direct access to other screens, etc. your best bet is reconfiguring some of these button from the webconf's wiring layout tab.
As explained above, while describing the ALT-mode, these buttons are assigned by default to MIDI Program Change messages:
- Normal mode: Program Change 1-4
- ALT mode: Program Change 5-8
This default configuration is fine for learning/recalling subsnapshots (ZS3) and you will find it's really useful if you use your zynthian as a keyboard expander.
Note:
Although all buttons and switches are fully configurable from the webconf tool (hardware->wiring->advanced), this guide refers to the official V5 profile configuration, that matches button printings. Of course, you are very welcome to experiment with button assignment and try different configurations. In fact, if you reach a sweet point, we could manage to produce an alternate keypad with custom printings. Simply contact us at the zynthian forum!
Note:
This V5 documentation is a work in progress and it will be improved along the next days/weeks. Meanwhile this happens, you can consult the Zynthian V1-V4 UI User Guide and the ZynSeq User Guide!

