Zynthian PyCharm Config
1 Context
Zynthian
The Zynthianis a synthesizer system using various linux engines. It runs on a raspberry pi 3 with various configurable control and interface options which are configured via a web interface. It's default hostname is available via avahi as zynthian.local the default password is raspberry and is run as root. This example will however operate against a zynthian with a host name of zynthian-nord. Cos that's what I've got.
PyCharm
PyCharm is an interactive development environment (IDE) from JetBrains that allows easy development of python code within projects. Many tasks are presented simply and efficiently to ease the development process. A paid version (Professional) is available which also offers various additions including the ability to deploy and debug to a remote server which in this case will be the Zynthian raspberry pi.
Git Hub
The Zynthian site at github is where the zynthian repository is maintained. It has a modular structure and this needs to be accommodated within the PyCharm environment. It is also wise to fork this if you intend to do development as we have a benevolent dictatorship operated from a roof top in Barcelona :-)
2 Acquiring the code
The best way to build a zynthian is using the Images. In some ways this is different from the normal approach to development as we will assume you have a working zynthian and have used the upgrade facility in the admin section or the update function in the Web Interface
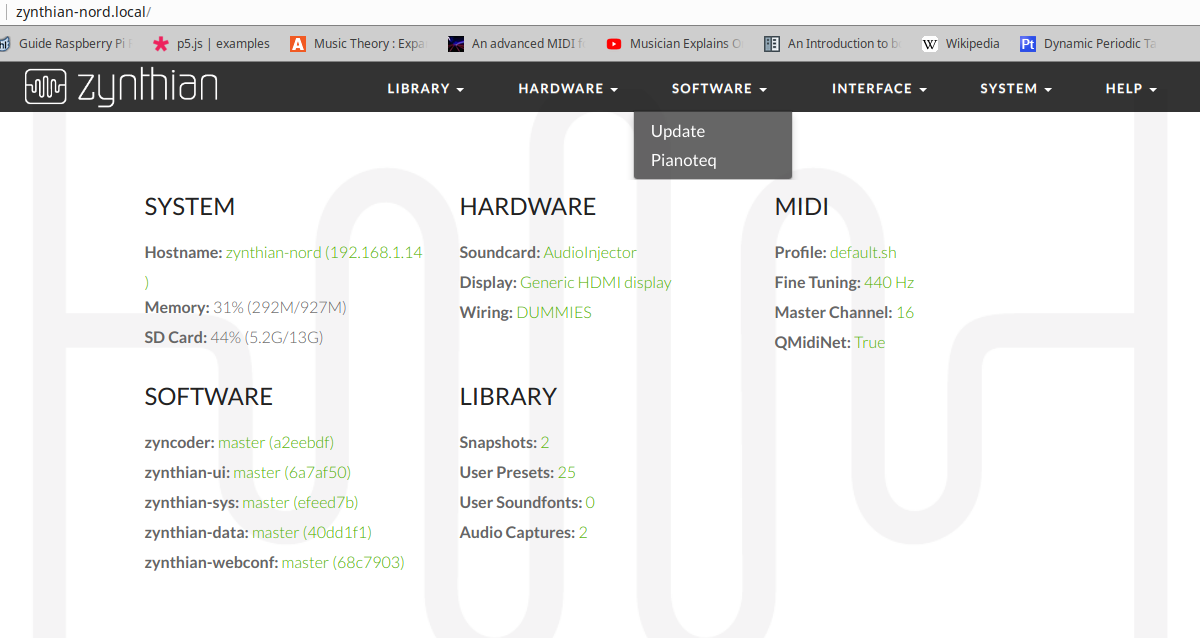
The Zynthian webconf software Update feature.
Notice that the various zynthian code components are displayed along with the branch name and latest commit hash. A Very helpful sanity check in a world of chaos.
Make sure you have a working zynthian first ... If you don't have a MIDI keyboard to hand you can used qmidinet(on linux) and it's windows equivalent (ipMIDI http://nerds.de) to connect from a host machine to the zynthian and then use a virtual keyboard (VMPK on linux, don't know about windows) to operate the zynthian . . .
3 Setting up Pycharm Project
1. Create a new, blank PyCharm project. Call it Zynthian.
2. Go to VCS->Checkout from Version Control->Git.
3. Use the GitHub URL for the given “repositoryname” and use the directory PyCharmProjects/Zynthian/repositoryname.
4. When you Click Clone, it will ask you “Would you like to open the directory …/PyCharmProjects/Zynthian/repositoryname?” Click Yes.
5. Then it will ask you “How would you like to open the project?” Select “Open in current window” and check “Add to currently opened projects”.
6. When you click “Okay” it will add it as a sub-project to Zynthian. You will see it in Bold letters. If it is not bolded, something went wrong somehwere.
7. Go into Settings->Version Control->Ignored Files. Make sure to add repositoryname/.idea folder to the list.
8. If you go to Settings->Version Control, you should see a list of all repositories that have been added and they all should say “Git”.
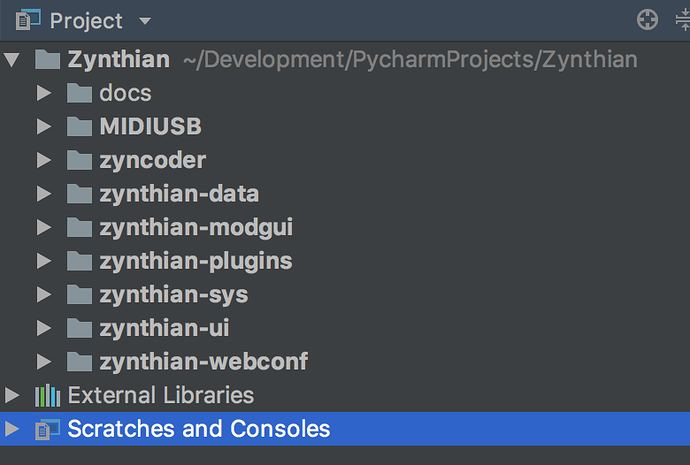
So, for example, my setup (so far) looks like this (note that docs is not bold because it is not a GitHub folder):
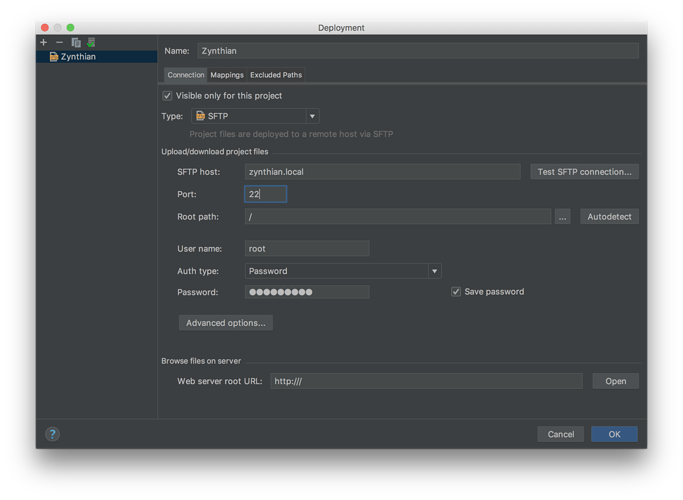
9. If you haven’t already, go to Tools->Deployment->Configuration. Set it up like this:
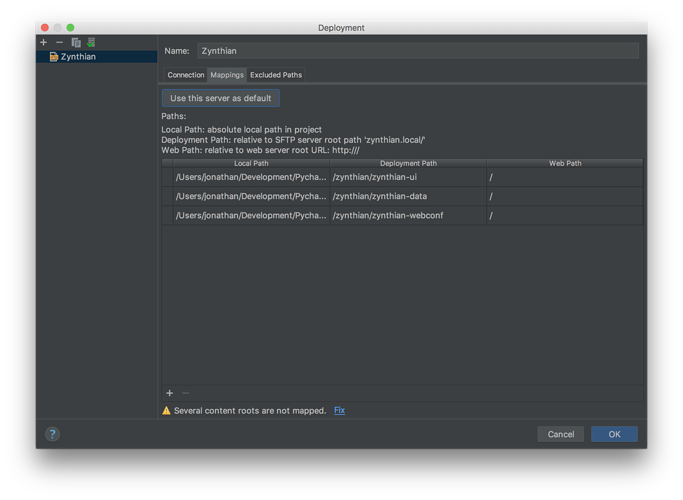
10. You can then set up the mappings between the projects and the Zynthian directories in the same dialog:
4 Setting up Remote Deployment
PyCharm handles remote file systems with the deployment feature this is one of the features that is only in the paid edition. Such is marketing . . . You define a relationship between the local file structure on the local machine and a file structure on the remote machine which in our case will be maintained over ssh. You can set it up so that files that are changed in the local environment where you would edit, are auto-majically copied to the remote directory. Also you can used the Right Hand click on a Project object (file, directory or whole project)
The trick with the remote debug is to define a remote Interpreter. imageimage.png1030x714 46 KB The Little cog wheel has a Show All option which is a bit non intuitive and is often used during the initial confusions. However we want the Add Menu Option.
Which gives us
imageimage.png843x617 36.4 KB Select the ssh option . . .
imageimage.png842x578 25.5 KB and fill all that in . . . imageimage.png858x578 21.5 KB and that. . . .
- AND THEN SET THE INTERPRETER TO python3 in the following **
imageimage.png838x573 23.5 KB Hey Presto All the code loaded on the remote pi !!
imageimage.png1030x705 79.9 KB


