Difference between revisions of "Web Configuration User Guide"
m (→File Browser) |
|||
| (79 intermediate revisions by 8 users not shown) | |||
| Line 1: | Line 1: | ||
| − | The | + | The '''WebConf Tool''' is the ''Zynthian Web Configuration Tool'', a website hosted inside your Zynthian device that allows you to configure and inspect the settings and attributes of your Zynthian. Note: if you can't access the WebConf tool, see '''Configuration by ssh''' at the bottom of this page. |
| − | + | ==Login== | |
| − | |||
| − | |||
| − | |||
| − | |||
| − | |||
| − | |||
| − | + | [[File:zynthian_webconf_login.png|600px|right]] | |
| − | You | + | You can access the Webconf tool from any computer using a web browser. Your Zynthian Box must be connected to your local network, or directly to your computer with an Ethernet cable (link local, point to point). |
| − | + | To connect your Zynthian Box to your local network you can use an Ethernet cable connected from your router to your Zynthian Box. Also, if WiFi has been configured previously in your Zynthian, you should be able to connect by WiFi. | |
| − | + | To access your Zynthian box from your browser, you can use either of these 2 methods: | |
| − | |||
| − | + | * Browse to '''http://zynthian.local''' or '''http://zynthian.lan'''. This doesn't work in all devices. Many Windows-PCs and mobile devices don't fully support the [https://en.wikipedia.org/wiki/Multicast_DNS mDNS] protocol that enable the use of named addresses on a local network. | |
| − | + | * If you your browser can’t find the '''zynthian.local''' address, you will then need to figure out what IP address has been assigned to your Zynthian Box. For more details, see [[Finding your IP address]]. Once you have your Zynthian's IP address (xxx.xxx.xxx.xxx), you can browse to '''http://xxx.xxx.xxx.xxx'''. | |
| − | + | <br clear=all> | |
| − | + | {{NoteBox| Default password is: '''opensynth''' <br> | |
| + | Releases prior to Oram use: ''raspberry'' }} | ||
| − | [[File: | + | ==Dashboard== |
| + | [[File:zynthian_webconf_dashboard.png|600px|right]] | ||
| − | + | The Dashboard displays basic configuration information about your Zynthian. | |
| − | + | <br clear=all> | |
| − | + | ==Library== | |
| + | The library is where multiple configuration snapshots, Instrument soundfonts, Presets, and Capture files are managed. | ||
| − | [[File: | + | ===Snapshots=== |
| + | [[File:WebLibrarySnapshots.png|600px|right]] | ||
| + | The Snapshots is where you can manage your snapshots (a stored configuration of instruments and settings.) | ||
| − | + | Bank/Program refers to MIDI Program Change commands that can enable a specific snapshot. | |
| − | |||
| − | [[File:Zynthian MIDI config. | + | ===Captures (Audio & MIDI)=== |
| + | Manage files that contain musical performance data that you have captured in various formats. | ||
| + | |||
| + | ===Presets & Soundfonts=== | ||
| + | |||
| + | This page allows for review of presets across all instruments and effects in your Zynthian box. A simple search is provided. You can also upload and download files containing presets and Soundfonts (files of sampled sounds for an instrument) directly to/from Zynthian. | ||
| + | |||
| + | |||
| + | |||
| + | <br clear=all> | ||
| + | |||
| + | ==Hardware== | ||
| + | |||
| + | ===Kit=== | ||
| + | Here you can select a 'kit' option based on past and preseent Zynthian kits sold from the online store. This will set appropriate settings in webconf based on the version chosen. | ||
| + | |||
| + | ===Audio=== | ||
| + | [[File:zynthian_webconf_hardware_audio.png|600px|right]] | ||
| + | |||
| + | This page lets you configure your sound cards and audio adapters. | ||
| + | |||
| + | Audio settings are very important and note that the Zynthian GUI generally won’t start with incorrect audio settings (You'll see an error display). Webconf will still allow you to set the device up in spite of a non start of the GUI and the generic USB soundcard setting will generally work. If it doesn’t you will need to play around with the USB alsa settings. Understanding of the jackd start up settings is probably what’s required. It’s normally the hw: setting. | ||
| + | |||
| + | The audio settings for USB are really just passed to jackd (the audio server) and if they don’t match then jackd won’t start hence no audio. The GUI logging in the webconf will tell you if this is happening. A very good starting point if it’s not working is by logging onto the Zynthian with SSH and giving the command: 'aplay -L' | ||
| + | |||
| + | This will tell you about ALSA settings (the audio hardware handler) and these settings will contain details that will be useful configuring the Jack settings. | ||
| + | |||
| + | More info: https://discourse.zynthian.org/t/audio-setup/2647 | ||
| + | |||
| + | <br clear=all> | ||
| + | |||
| + | ===Display=== | ||
| + | [[File:zynthian_webconf_hardware_display.png|600px|right]] | ||
| + | |||
| + | This is where you can configure the touchscreen display. Zynthian provides a set of preconfigured settings for various displays from the first drop down menu. | ||
| + | |||
| + | If required, use the remaining fields to customise width, height and rotation settings to allow you to deal with any aspect ratio or screen orientation issues. The UI font settings might need altering to fit the screen. | ||
| + | |||
| + | Adjustments to display settings generally require a reboot. | ||
| + | |||
| + | <br clear=all> | ||
| + | |||
| + | ===Wiring=== | ||
| + | [[File:zynthian_webconf_hardware_wiring.png|600px|right]] | ||
| + | This page allows configuration of the "wiring" for your encoders/knobs and switches. Make a selection from the 'Wiring Layout' drop-down menu based on your hardware used e.g. a kit from the store, a Zynaptik module (I/O expansion purchasable [https://shop.zynthian.org/shop/brd-0021-1-zynaptik-3-midi-242 here]) or your own hardware. Depending on your selection, this will change the available fields that follow. Select "dummies" if your zynthian has none. | ||
| + | |||
| + | ==== Configure Additional Connections via Serial Port Expander (MCP23017) ==== | ||
| + | In combination with an serial port expander chip (e.g. MCP23017) Zynthian allows multiple additional inputs/outputs. When adding a single MCP23017 chip, connected hardware is assigned a number in the Encoders A/B/Switches fields. '''''The numbers assignable to a single MCP chip range from 100-115 (second MCP chip ranges 200-215).''''' So for a single encoder with push switch connected to the first three in/outs of Bank A of the MCP chip you will want to enter 100 (enc A), 101 (enc B) and 102 (switch) consecutively (or some variation of, depending on your wiring). | ||
| + | |||
| + | You can also configure the V4's customizable switches (S1, S2, S3 & S4), the zynaptik's analog & digital inputs and 2 TOF distance sensors that can be assigned to MIDI actions. | ||
| + | |||
| + | ==== Serial Port Expander Interrupt Connections ==== | ||
| + | The last two fields in the image show the interrupt GPIO pins that the MCP23017 chip will use to communicate with the Pi. If you are creating custom hardware you may wish to adjust these from the default values. It's easier to use the pin number in brackets as a reference to make your connections (unless you understand how wiringPi assigns GPIOs). | ||
| + | |||
| + | ==== Further configuration info ==== | ||
| + | For a deeper dive on the topic with info about both the Zynaptik modules and how to configure custom hardware see [https://wiki.zynthian.org/index.php/Adding_Extra_I/O_with_the_Zynaptik_Module Adding Extra I/O section]. | ||
| + | <br clear=all> | ||
| + | |||
| + | ===Options=== | ||
| + | |||
| + | Configure hardware options on this page such as OTG, USB speed limiting, the level of overclocking for your raspberry pi and areas for custom config and boot commands. | ||
| + | |||
| + | ==Software== | ||
| + | ===Engines=== | ||
| + | [[File:Webconf engines page.png|600px|right]] | ||
| + | Manage and search the installed engines (LV2 plugins). Use the checkbox to Enable/Disable synthesizers, audio effects and MIDI tools. A basic rating system is provided to gauge the quality and complexity of the plugins. | ||
| + | |||
| + | ===Pianoteq=== | ||
| + | Pianoteq is a proprietary softsynth that uses physical modelling to simulate real (mainly stringed) instruments. Configure the Pianoteq plugin. Enable license, add instrument packs, etc. | ||
| + | |||
| + | |||
| + | ===DSP56300=== | ||
| + | The DSP56300 emulator by The Usual Suspects, is a software emulation of the popular DSP563XX family of DSP chips developed originally by Motorola. They were used in a number of hardware synthesizers and other musical gear from the mid 90s, such as Access Virus A, B, C, TI / Clavia Nord Lead 2X, 3, Modular / Waldorf Q, Microwave II / Novation Supernova, Nova and many others. | ||
| + | |||
| + | For using the emulator you must have legal access to a ROM file containing the firmware for the device you want to emulate. If you are the lucky owner of one of this wonderful pieces of gear, you may have legal access to the firmware ROM file and you could use it with this emulator. Please, be aware that most (if not all!) firmware ROM files are not free software and you are not allowed to share them with anyone without permission from the copyright owners (aka, the device manufacturer). | ||
| + | |||
| + | From this page you can upload the firmware ROM files for the supported devices. | ||
| + | |||
| + | ===Update=== | ||
| + | Update the Zynthian software. An update option is also available directly from the admin menu of the native Zynthian UI. | ||
| + | <br clear=all> | ||
| + | |||
| + | ===Version=== | ||
| + | [[File:Repositories page webconf oram.png|600px|right]] | ||
| + | Allows selection of the Zynthian Repositories to give access to updates and new features. | ||
| + | |||
| + | |||
| + | <br clear=all> | ||
| + | |||
| + | ==Interface== | ||
| + | |||
| + | This is where you configure the various interfaces in your Zynthian | ||
| + | [[File:Webconf User Interface Page Screenshot.png|600px|right]] | ||
| + | |||
| + | ===UI Options=== | ||
| + | |||
| + | This pages allows adjustment of various UI settings including: | ||
| + | * Power saving (screen off delay) | ||
| + | * Save current state | ||
| + | * MIDI over Network | ||
| + | * Enable/disable VNC for remote screen access | ||
| + | * Fonts and interface colours | ||
| + | |||
| + | <br clear=all> | ||
| + | |||
| + | |||
| + | ===UI Key Binding=== | ||
| + | |||
| + | [[File:Computer keyboard binding.png|600px|right]] | ||
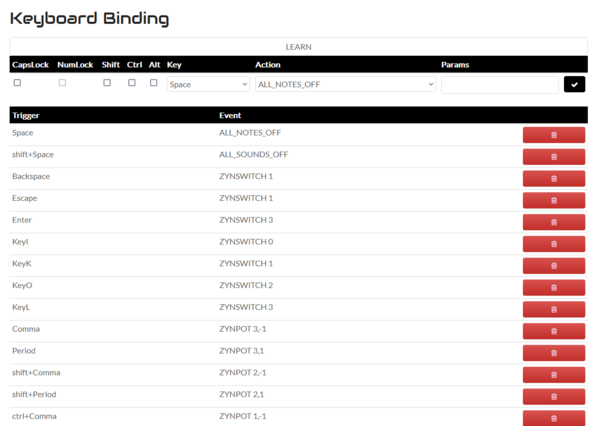
| + | The keyboard Binding Page allows configuration of particular functions from a connected USB keyboard this can obviously be a | ||
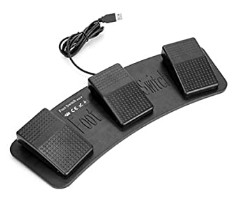
| + | full ASCII keyboard or a small number pad or even 3 foot switches. | ||
| + | |||
| + | [[File:3footpedal.png|left|400px]] | ||
| + | |||
| + | <br clear=all> | ||
| + | |||
| + | ====UI Log==== | ||
| + | [[File:UIlog.png|600px|right]] | ||
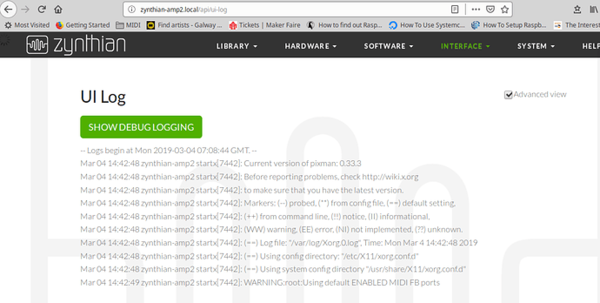
| + | Display a log of User Interface actions for debugging. This is a good place to check for any hardware related configuration issues such as buttons, display and audio. | ||
| + | |||
| + | <br clear=all> | ||
| + | |||
| + | ===MIDI Options=== | ||
| + | [[File:Midi options webconf oram.png|600px|right]] | ||
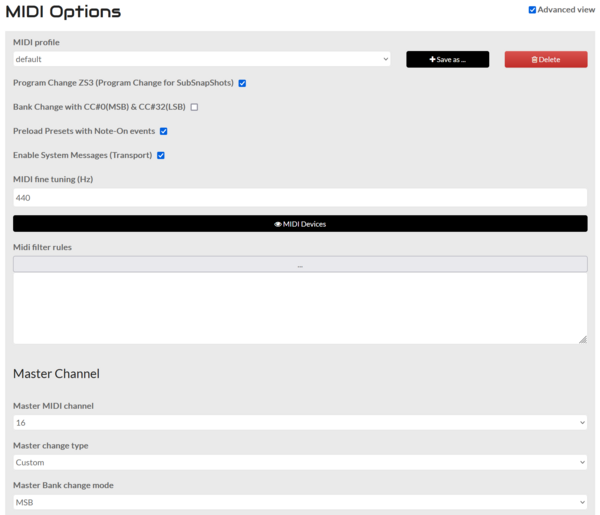
| + | MIDI configuration page. Save, restore and delete profiles for your custom MIDI settings made on this page. | ||
| + | |||
| + | * Program Change ZS3 (Program Change for SubSnapShots) | ||
| + | * Bank Change with CC#0(MSB) & CC#32(LSB) | ||
| + | * Preload Presets with Note-On events | ||
| + | * Enable System Messages (Transport) | ||
| + | |||
| + | ====Midi Profile==== | ||
| + | Save, restore and delete profiles for your custom MIDI configurations made on this page. | ||
| + | |||
| + | ====Midi fine tuning (Hz)==== | ||
| + | Make fine tuning adjustments | ||
| + | <br clear=all> | ||
| + | |||
| + | ====Midi Devices==== | ||
| + | [[File:Midi devices page webconf oram.png|600px|right]] | ||
| + | This page now provides a summary of your connected hardware MIDI INPUT/OUTPUT ports. For midi configuration refer to the admin menu of the Zynthian UI. | ||
| + | <br clear=all> | ||
| + | |||
| + | ====Configure MIDI Filter/Router==== | ||
| + | [[File:zynthian_webconf_midi_router.png|600px|right]] | ||
| + | The MIDI filter allows to filter the MIDI messages using rules. You can use the visual rule builder, or type the rules directly. | ||
| + | [[Configure_MIDI_Filter/Router|Read the MIDI Filter Rule Language documentation.]] | ||
| + | <br clear=all> | ||
| + | |||
| + | ====Master Channel==== | ||
| + | Allows setting a master midi channel to allow program change and bank change messages and master key actions. | ||
| + | |||
| + | ====Master Key Action==== | ||
| + | Use this screen to assign midi note values to control the Zynthian UI. | ||
| + | |||
| + | <br clear=all> | ||
| + | |||
| + | ====Using MIDI controllers instead of Encoders==== | ||
| + | Using midi driven encoders instead of encoders built-in to the Zynthian is a little bit confusing, and that’s conceptual rather than technical. A MIDI controller is normally a pot or an encoder pretending to be a potentiometer. Its value varies from 0 to 127. The problem with that is the Zynthian encoders work as proper encoders using up and down signals. To produce something that could control a list properly when you move to a specific screen after you’ve come from another page is rather complicated because most pots will simply send the maximum value but not repeatedly send if further turns are made. | ||
| + | |||
| + | The next issue is handling the push button functions of the encoder and bold presses and long presses. | ||
| + | |||
| + | You can send CUIA commands to drive the GUI and that would allow you to drive the whole device from push buttons but it might be a lot of switches. | ||
| + | |||
| + | And you really can do an awful lot with a mouse! Really easy if you get a wireless(not Bluetooth) one it’s really intuitive once you learn the trick to do the back button: press or click the title bar of the screen to go back. | ||
| + | |||
| + | <br clear=all> | ||
| + | |||
| + | ===MIDI Log=== | ||
| + | [[File:Midi log webconf oram.png|600px|right|none]] | ||
| + | Displays all received MIDI messages. This page now provides a filter selection to focus messages on the various midi inputs & outputs in Zynthian. Useful for debugging MIDI connection and configuration. | ||
| + | |||
| + | <br clear=all> | ||
| + | |||
| + | |||
| + | ===VNC-UI=== | ||
| + | This link opens a tab with the Zynthian UI, same as you would see with a directly connected display. | ||
| + | ===VNC-Engines=== | ||
| + | This link opens a tab with a desktop style GUI for and loaded engines (synths, effects etc.) that have a built-in UI. | ||
| + | ===Terminal=== | ||
| + | Access a terminal window for the OS directly from Webconf to debug, troubleshoot etc. | ||
| + | |||
| + | <br clear=all> | ||
| + | |||
| + | |||
| + | |||
| + | ==System== | ||
| + | In addition to the below you can reboot, shut down and logout from webconf here. | ||
| + | |||
| + | ===File Browser=== | ||
| + | |||
| + | [[File:File browser.png|600px|right]] | ||
| + | |||
| + | Allows you to manage files on the Zynthian. | ||
| + | The default credentials are user: zynthian, password: opensynth. | ||
| + | |||
| + | The directories correspond to the path /zynthian/zynthian-sw/filebrowser/root. | ||
| + | |||
| + | ===Security / Access=== | ||
| + | |||
| + | [[File:Security-access.png|600px|right]] | ||
| + | |||
| + | Allows you to change the password & set the hostname of the zynthian ( don't forget to select advanced to get hostname) | ||
| + | |||
| + | <br clear=all> | ||
| + | |||
| + | ===Backup & Restore=== | ||
| + | |||
| + | These pages allow you to backup & restore your system & data components. It's a good idea to backup regularly, especially if you're trying different versions of the software (e.g. testing) | ||
| + | |||
| + | == Configuration with SSH == | ||
| + | For Linux savvy users: | ||
| + | |||
| + | If you can't access the WebConf pages with a browser, you can login with ssh and "manually" edit the configuration file. | ||
| + | |||
| + | Simply edit this file: | ||
| + | |||
| + | /zynthian/config/zynthian_envars.sh | ||
| + | |||
| + | and run this command after saving the changes: | ||
| + | |||
| + | # zynthian_update_sys.sh | ||
Latest revision as of 10:57, 17 November 2025
The WebConf Tool is the Zynthian Web Configuration Tool, a website hosted inside your Zynthian device that allows you to configure and inspect the settings and attributes of your Zynthian. Note: if you can't access the WebConf tool, see Configuration by ssh at the bottom of this page.
1 Login
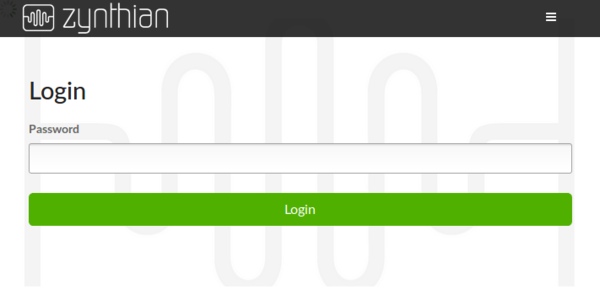
You can access the Webconf tool from any computer using a web browser. Your Zynthian Box must be connected to your local network, or directly to your computer with an Ethernet cable (link local, point to point).
To connect your Zynthian Box to your local network you can use an Ethernet cable connected from your router to your Zynthian Box. Also, if WiFi has been configured previously in your Zynthian, you should be able to connect by WiFi.
To access your Zynthian box from your browser, you can use either of these 2 methods:
- Browse to http://zynthian.local or http://zynthian.lan. This doesn't work in all devices. Many Windows-PCs and mobile devices don't fully support the mDNS protocol that enable the use of named addresses on a local network.
- If you your browser can’t find the zynthian.local address, you will then need to figure out what IP address has been assigned to your Zynthian Box. For more details, see Finding your IP address. Once you have your Zynthian's IP address (xxx.xxx.xxx.xxx), you can browse to http://xxx.xxx.xxx.xxx.
Note:
Default password is: opensynth
Releases prior to Oram use: raspberry
2 Dashboard
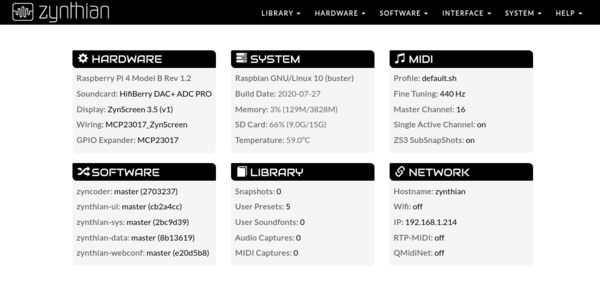
The Dashboard displays basic configuration information about your Zynthian.
3 Library
The library is where multiple configuration snapshots, Instrument soundfonts, Presets, and Capture files are managed.
3.1 Snapshots
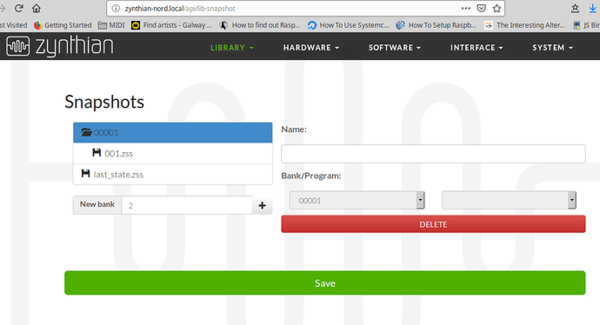
The Snapshots is where you can manage your snapshots (a stored configuration of instruments and settings.)
Bank/Program refers to MIDI Program Change commands that can enable a specific snapshot.
3.2 Captures (Audio & MIDI)
Manage files that contain musical performance data that you have captured in various formats.
3.3 Presets & Soundfonts
This page allows for review of presets across all instruments and effects in your Zynthian box. A simple search is provided. You can also upload and download files containing presets and Soundfonts (files of sampled sounds for an instrument) directly to/from Zynthian.
4 Hardware
4.1 Kit
Here you can select a 'kit' option based on past and preseent Zynthian kits sold from the online store. This will set appropriate settings in webconf based on the version chosen.
4.2 Audio
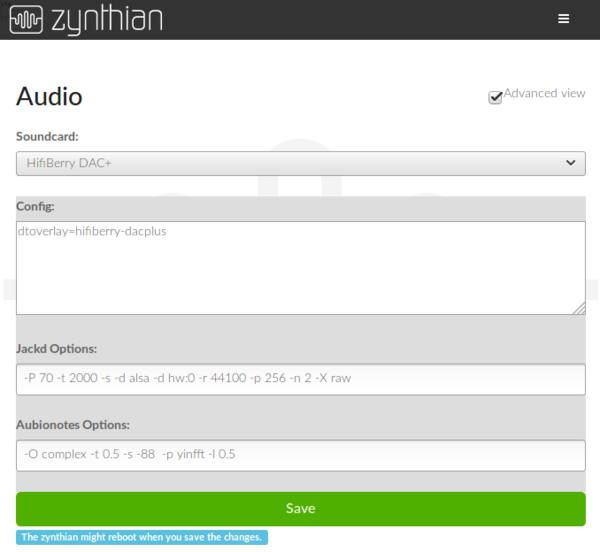
This page lets you configure your sound cards and audio adapters.
Audio settings are very important and note that the Zynthian GUI generally won’t start with incorrect audio settings (You'll see an error display). Webconf will still allow you to set the device up in spite of a non start of the GUI and the generic USB soundcard setting will generally work. If it doesn’t you will need to play around with the USB alsa settings. Understanding of the jackd start up settings is probably what’s required. It’s normally the hw: setting.
The audio settings for USB are really just passed to jackd (the audio server) and if they don’t match then jackd won’t start hence no audio. The GUI logging in the webconf will tell you if this is happening. A very good starting point if it’s not working is by logging onto the Zynthian with SSH and giving the command: 'aplay -L'
This will tell you about ALSA settings (the audio hardware handler) and these settings will contain details that will be useful configuring the Jack settings.
More info: https://discourse.zynthian.org/t/audio-setup/2647
4.3 Display
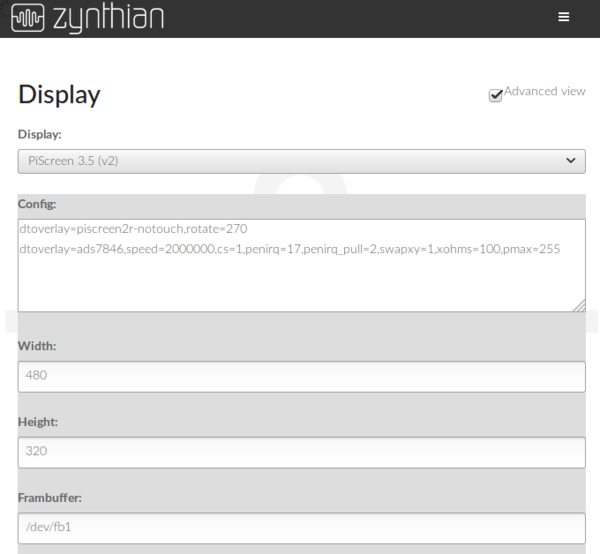
This is where you can configure the touchscreen display. Zynthian provides a set of preconfigured settings for various displays from the first drop down menu.
If required, use the remaining fields to customise width, height and rotation settings to allow you to deal with any aspect ratio or screen orientation issues. The UI font settings might need altering to fit the screen.
Adjustments to display settings generally require a reboot.
4.4 Wiring
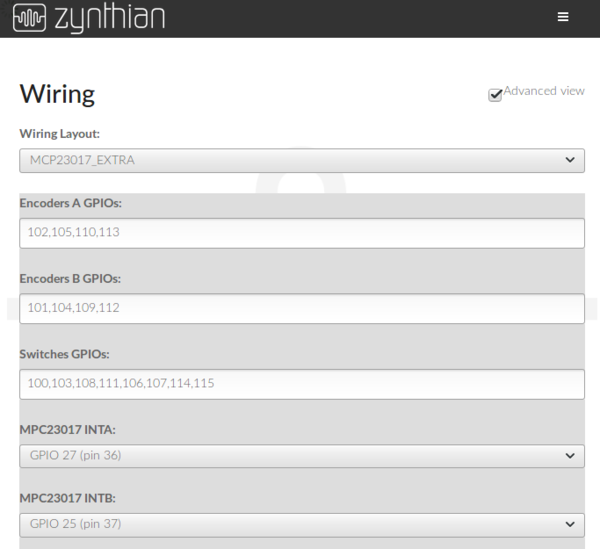
This page allows configuration of the "wiring" for your encoders/knobs and switches. Make a selection from the 'Wiring Layout' drop-down menu based on your hardware used e.g. a kit from the store, a Zynaptik module (I/O expansion purchasable here) or your own hardware. Depending on your selection, this will change the available fields that follow. Select "dummies" if your zynthian has none.
4.4.1 Configure Additional Connections via Serial Port Expander (MCP23017)
In combination with an serial port expander chip (e.g. MCP23017) Zynthian allows multiple additional inputs/outputs. When adding a single MCP23017 chip, connected hardware is assigned a number in the Encoders A/B/Switches fields. The numbers assignable to a single MCP chip range from 100-115 (second MCP chip ranges 200-215). So for a single encoder with push switch connected to the first three in/outs of Bank A of the MCP chip you will want to enter 100 (enc A), 101 (enc B) and 102 (switch) consecutively (or some variation of, depending on your wiring).
You can also configure the V4's customizable switches (S1, S2, S3 & S4), the zynaptik's analog & digital inputs and 2 TOF distance sensors that can be assigned to MIDI actions.
4.4.2 Serial Port Expander Interrupt Connections
The last two fields in the image show the interrupt GPIO pins that the MCP23017 chip will use to communicate with the Pi. If you are creating custom hardware you may wish to adjust these from the default values. It's easier to use the pin number in brackets as a reference to make your connections (unless you understand how wiringPi assigns GPIOs).
4.4.3 Further configuration info
For a deeper dive on the topic with info about both the Zynaptik modules and how to configure custom hardware see Adding Extra I/O section.
4.5 Options
Configure hardware options on this page such as OTG, USB speed limiting, the level of overclocking for your raspberry pi and areas for custom config and boot commands.
5 Software
5.1 Engines
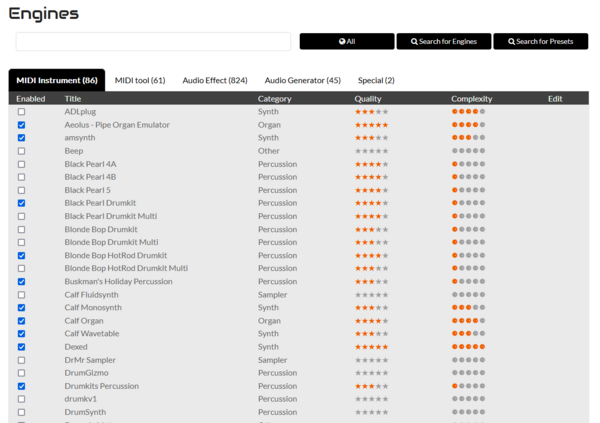
Manage and search the installed engines (LV2 plugins). Use the checkbox to Enable/Disable synthesizers, audio effects and MIDI tools. A basic rating system is provided to gauge the quality and complexity of the plugins.
5.2 Pianoteq
Pianoteq is a proprietary softsynth that uses physical modelling to simulate real (mainly stringed) instruments. Configure the Pianoteq plugin. Enable license, add instrument packs, etc.
5.3 DSP56300
The DSP56300 emulator by The Usual Suspects, is a software emulation of the popular DSP563XX family of DSP chips developed originally by Motorola. They were used in a number of hardware synthesizers and other musical gear from the mid 90s, such as Access Virus A, B, C, TI / Clavia Nord Lead 2X, 3, Modular / Waldorf Q, Microwave II / Novation Supernova, Nova and many others.
For using the emulator you must have legal access to a ROM file containing the firmware for the device you want to emulate. If you are the lucky owner of one of this wonderful pieces of gear, you may have legal access to the firmware ROM file and you could use it with this emulator. Please, be aware that most (if not all!) firmware ROM files are not free software and you are not allowed to share them with anyone without permission from the copyright owners (aka, the device manufacturer).
From this page you can upload the firmware ROM files for the supported devices.
5.4 Update
Update the Zynthian software. An update option is also available directly from the admin menu of the native Zynthian UI.
5.5 Version
Allows selection of the Zynthian Repositories to give access to updates and new features.
6 Interface
This is where you configure the various interfaces in your Zynthian
6.1 UI Options
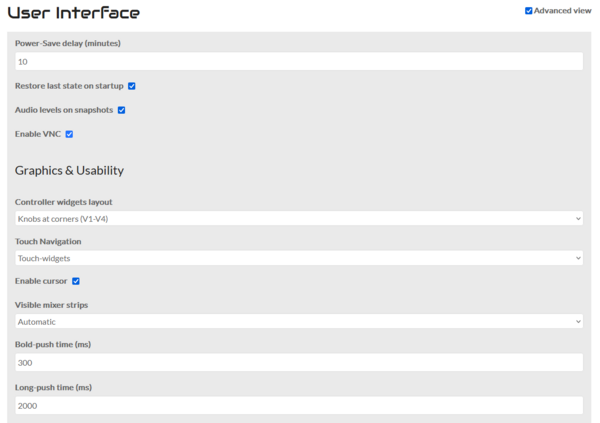
This pages allows adjustment of various UI settings including:
- Power saving (screen off delay)
- Save current state
- MIDI over Network
- Enable/disable VNC for remote screen access
- Fonts and interface colours
6.2 UI Key Binding
The keyboard Binding Page allows configuration of particular functions from a connected USB keyboard this can obviously be a full ASCII keyboard or a small number pad or even 3 foot switches.
6.2.1 UI Log
Display a log of User Interface actions for debugging. This is a good place to check for any hardware related configuration issues such as buttons, display and audio.
6.3 MIDI Options
MIDI configuration page. Save, restore and delete profiles for your custom MIDI settings made on this page.
- Program Change ZS3 (Program Change for SubSnapShots)
- Bank Change with CC#0(MSB) & CC#32(LSB)
- Preload Presets with Note-On events
- Enable System Messages (Transport)
6.3.1 Midi Profile
Save, restore and delete profiles for your custom MIDI configurations made on this page.
6.3.2 Midi fine tuning (Hz)
Make fine tuning adjustments
6.3.3 Midi Devices
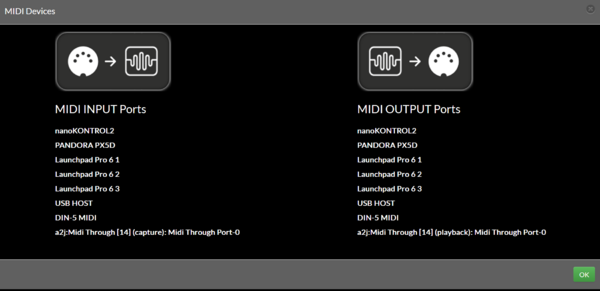
This page now provides a summary of your connected hardware MIDI INPUT/OUTPUT ports. For midi configuration refer to the admin menu of the Zynthian UI.
6.3.4 Configure MIDI Filter/Router
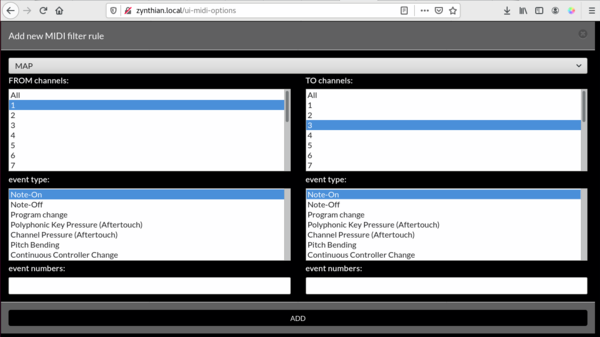
The MIDI filter allows to filter the MIDI messages using rules. You can use the visual rule builder, or type the rules directly.
Read the MIDI Filter Rule Language documentation.
6.3.5 Master Channel
Allows setting a master midi channel to allow program change and bank change messages and master key actions.
6.3.6 Master Key Action
Use this screen to assign midi note values to control the Zynthian UI.
6.3.7 Using MIDI controllers instead of Encoders
Using midi driven encoders instead of encoders built-in to the Zynthian is a little bit confusing, and that’s conceptual rather than technical. A MIDI controller is normally a pot or an encoder pretending to be a potentiometer. Its value varies from 0 to 127. The problem with that is the Zynthian encoders work as proper encoders using up and down signals. To produce something that could control a list properly when you move to a specific screen after you’ve come from another page is rather complicated because most pots will simply send the maximum value but not repeatedly send if further turns are made.
The next issue is handling the push button functions of the encoder and bold presses and long presses.
You can send CUIA commands to drive the GUI and that would allow you to drive the whole device from push buttons but it might be a lot of switches.
And you really can do an awful lot with a mouse! Really easy if you get a wireless(not Bluetooth) one it’s really intuitive once you learn the trick to do the back button: press or click the title bar of the screen to go back.
6.4 MIDI Log
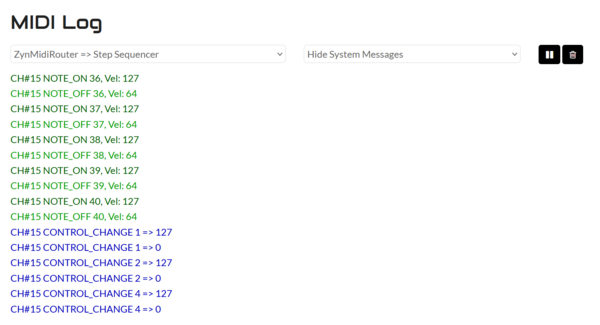
Displays all received MIDI messages. This page now provides a filter selection to focus messages on the various midi inputs & outputs in Zynthian. Useful for debugging MIDI connection and configuration.
6.5 VNC-UI
This link opens a tab with the Zynthian UI, same as you would see with a directly connected display.
6.6 VNC-Engines
This link opens a tab with a desktop style GUI for and loaded engines (synths, effects etc.) that have a built-in UI.
6.7 Terminal
Access a terminal window for the OS directly from Webconf to debug, troubleshoot etc.
7 System
In addition to the below you can reboot, shut down and logout from webconf here.
7.1 File Browser
Allows you to manage files on the Zynthian. The default credentials are user: zynthian, password: opensynth.
The directories correspond to the path /zynthian/zynthian-sw/filebrowser/root.
7.2 Security / Access
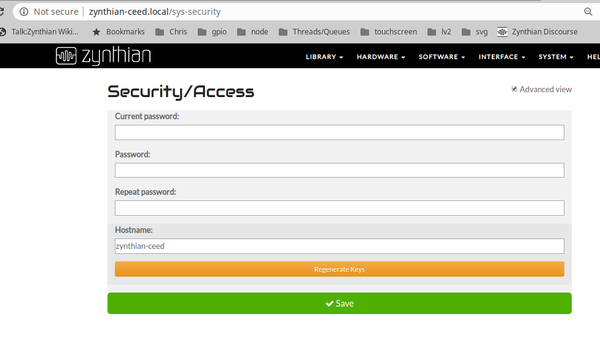
Allows you to change the password & set the hostname of the zynthian ( don't forget to select advanced to get hostname)
7.3 Backup & Restore
These pages allow you to backup & restore your system & data components. It's a good idea to backup regularly, especially if you're trying different versions of the software (e.g. testing)
8 Configuration with SSH
For Linux savvy users:
If you can't access the WebConf pages with a browser, you can login with ssh and "manually" edit the configuration file.
Simply edit this file:
/zynthian/config/zynthian_envars.sh
and run this command after saving the changes:
# zynthian_update_sys.sh
