Difference between revisions of "Building a Zynthian Box using an official Kit"
| Line 146: | Line 146: | ||
+ 40 row-pin GPIO male connector, for connecting the '''main ribbon bus cable''' | + 40 row-pin GPIO male connector, for connecting the '''main ribbon bus cable''' | ||
+ 3 pin header connector, for connecting the extra audio line-out Jack connectors | + 3 pin header connector, for connecting the extra audio line-out Jack connectors | ||
| + | |||
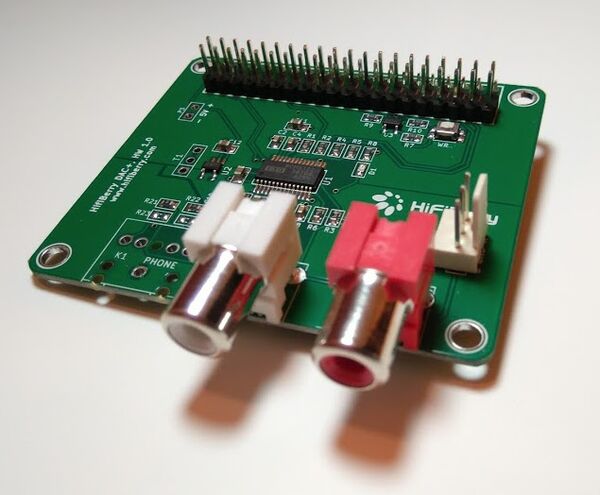
| + | [[File:Hifiberry_dacplus_extra_connectors_mounted.jpg|600px]] | ||
===PiTFT 2.8' TouchScreen customizing=== | ===PiTFT 2.8' TouchScreen customizing=== | ||
| Line 158: | Line 160: | ||
If you have a clonic PiTFT 2.8' touchscreen, probably you don't have the side 26-pin male connector soldered in the board, so you should solder it by your own. Also, normally the female connector in the clonic versions is higher that in the original and more annoying yet, so, you will want to remove it with a saw. If you do so, i also recommend to use a vice. | If you have a clonic PiTFT 2.8' touchscreen, probably you don't have the side 26-pin male connector soldered in the board, so you should solder it by your own. Also, normally the female connector in the clonic versions is higher that in the original and more annoying yet, so, you will want to remove it with a saw. If you do so, i also recommend to use a vice. | ||
| + | |||
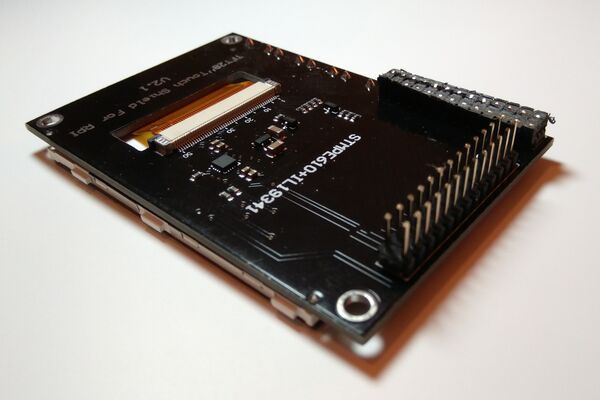
| + | [[File:Clonic_pitft_tweaked_connectors.jpg|600px]] | ||
| + | |||
===Other Soundcards and Displays=== | ===Other Soundcards and Displays=== | ||
Revision as of 19:34, 15 January 2017
1 Introduction
This tutorial is intended for those who are building a Zynthian Box using one of the kits i offer here:
Getting a Zynthian Kit
Anyway, it's quite detailed and can be used as a guide to build your Zynthian Box from scratch. Of course, you will have to be more creative if you want to do it in that way ;-)
2 Some definitions
2.1 Zynthian
It's a project with the goal of creating an Open Synth Platform. It's a community-driven project. If you are here, probably you already know this ;-)
2.2 Zynthian Software
The Zynthian Software stack consist of:
+ GNU Linux Operating System: Raspbian Jessie (Minibian is used in the last SD images)
+ Jack Audio Daemon
+ MOD-HOST + MOD-UI software, from ModDevices (github repositories)
+ A collection of standalone Synth Engines & LV2 Plugins (see Supported Synth Engines & Plugins)
+ Zynthian User Interface (github repository)
All the software used by Zynthian is Free Software (free as freedom) and it's covered by the GPL license or similar. If you don't know what i'm talking about, please, take a look to this: What is Free Software?
The easiest way of getting the software is downloading the last "official" SD image from here:
Download Zynthian "Gorgona" SD-image
This SD-image include all the zynthian software, properly configured and ready to use. Plug and play! ;-)
After downloading the SD-image, you have to write it to an SD-card. Depending on your OS you have to choose how to create the SD-card. You need a minimum size of 16GB for the full "Gorgona" image and 8GB for the "Gorgonilla" lite image. There is a really good manual for this at https://www.raspberrypi.org/documentation/installation/installing-images/.
If you prefer, you can build your own SD image following these instructions:
Building the SD Image using the Setup Script
2.3 Zynthian Box
A Zynthian Box is a hardware device designed to run the Zynthian Software. Currently it's based in the Raspberry Pi platform, but it could be adapted easily to other computer platforms.
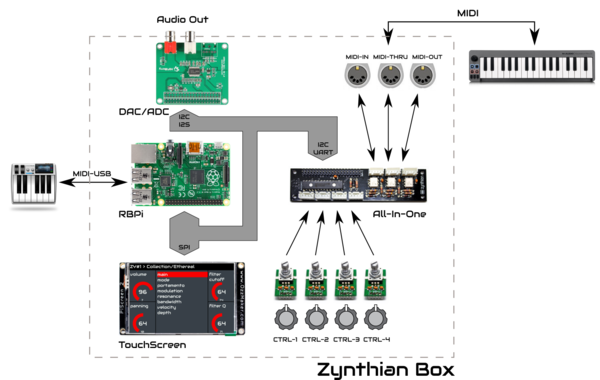
This is a sketch with the main blocks of a Zynthian Box:
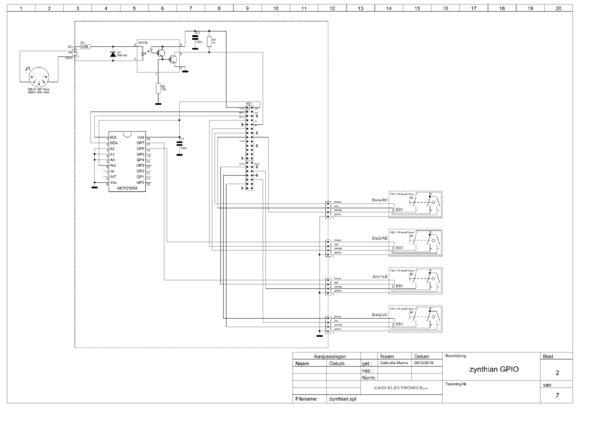
And this is the electric scheme of a Zynthian Box, excluding soundcard and display:
In the project repositories you will find all the electric schemes, PCB specifications, Herber files, etc. to build your own zynthian box from scratch:
- Zynthian Hardware Repository
- Zynthian Case Repository
2.4 Zynthian Kit
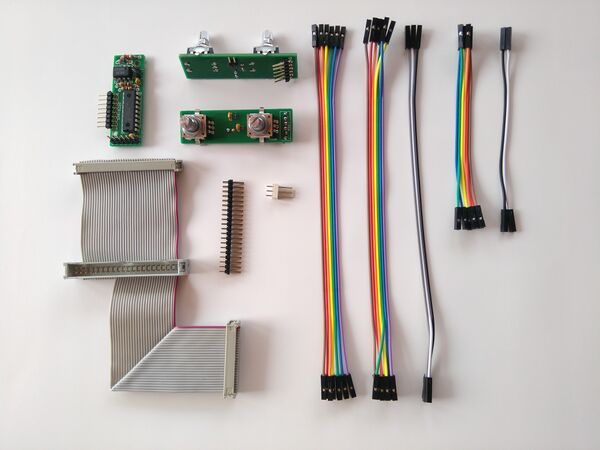
A Zynthian Kit is a set of SPECIFIC electronic modules designed for building a Zynthian Box. This tutorial refers to the "canonical" zynthian kit, that is composed of:
+ 4 x Controller Modules (rotary encoder + switch)
+ 1 x 2in1 Module (GPIO expander + MIDI IN)
+ Main ribbon bus cable
+ Dupont color-wire connectors
Of course, other arrangements are possible and some people is working in different ones:
- A build with variations, by vagnscott
- Another Wiring, by Imager
2.5 Zynthian Case
It's the enclosure used to put on all the parts. Again, this tutorial refers to the "cannonical" zynthian aluminum case, that is designed to be used in conjunction with the next parts:
+ Raspberry Pi 2/3
+ Soundcard HifiBerry DAC+ (also pro & lite)
+ Display Adafruit PiTFT 2.8" touchscreen (or clonic version)
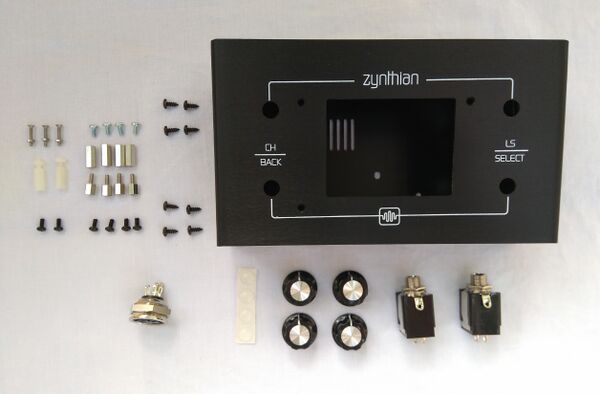
The case is available as a kit, with all the needed connectors, knobs, bolts & nuts:
If you intend to use a different soundcard or display, probably it won't fit the case and you will have to modify it. Of course, you can build your own case like other people has done:
- Zynthian Enclosures
- Success Cases
3 Building the Zynthian Kit
3.1 Controller Modules
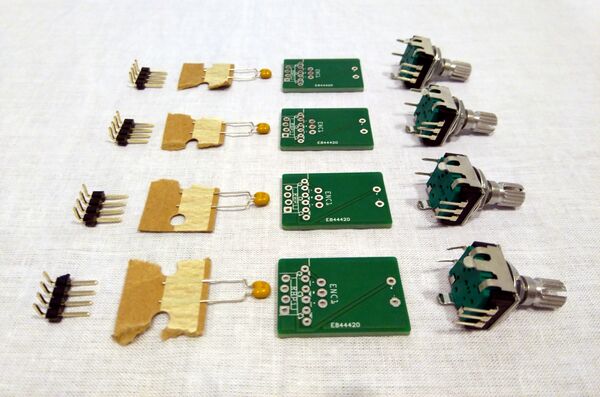
The controller module kit is composed of:
+ 4 x controller PCBs
+ 4 x rotary encoders with switch (PEC11R-4215K-S0024)
+ 4 x ceramic capacitor 100nF (C1)
+ 4 x 4-pin-row male connector (angle)
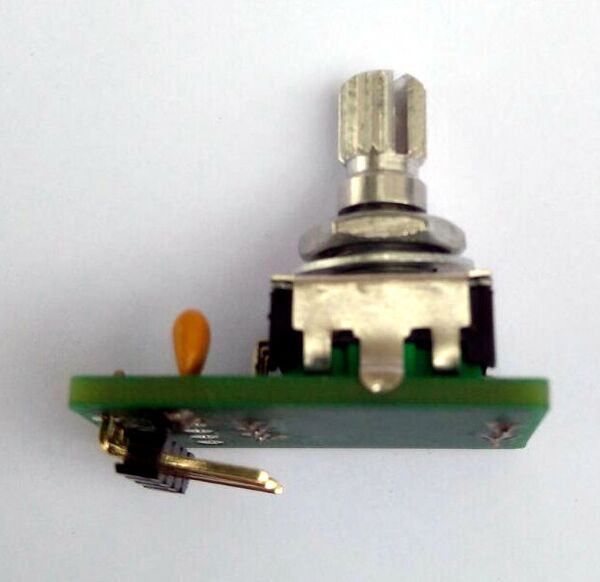
These are the steps for building one module:
1. Bend the encoder's securing tabs to 90º, so you can insert it in the upside of the PCB (the labeled side!).
2. Place the capacitor in the C1 position (the most right!)
3. Solder the encoder and capacitor carefully. Always avoid overheating!
4. Place the pin-row connector in the downside of the PCB, with the angle pins facing inwards (look the photo!)
5. Solder the pin-row carefully.
6. Bend the pin-row outwards a little bit, like shown in the photo. You can use a screwdriver or similar to do it.
You have to build 4 controller modules, so to have to repeat these steps 4 times.
3.2 2in1 Module
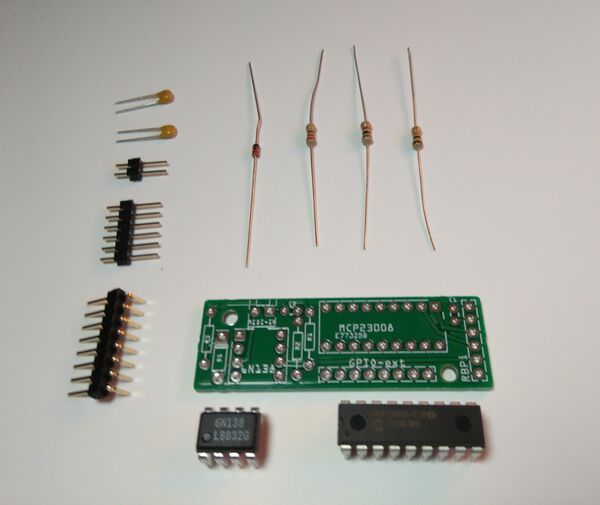
The 2in1 module kit is composed of:
+ 1 x 2in1 PCB
+ 1 x opto-coupler 6N138
+ 1 x dioode 1N4148 (D1)
+ 1 x resistor 1K (R1)
+ 1 x resistor 10K (R2)
+ 1 x resistor 220 (R3)
+ 1 x MCP23008
+ 2 x ceramic capacitor 100nF (C1, C2)
+ 1 x 8-row-pin male connector (angle)
+ 1 x 6-row-pin male connector
+ 1 x 2-row-pin male connector
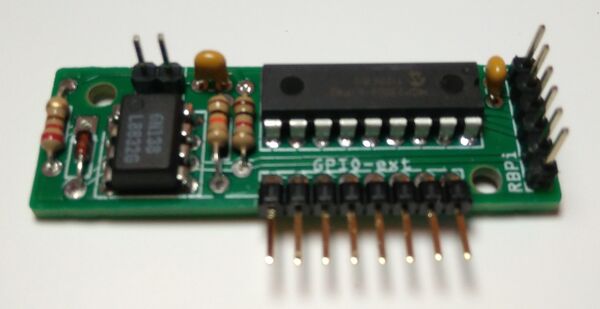
These are the steps for building the 2in1 module:
1. Place all the components in the upside of the PCB (the labeled side!). Put attention to the orientation of the ICs and diode.
2. Solder the encoder and capacitor carefully. Always avoid overheating!
4 Tweaking the Modules
4.1 HifiBerry DAC+ soundcard customizing
If you are using the HifiBerry DAC+ soundcard (also lite & pro versions), you should add 2 extra connectors to the board:
+ 40 row-pin GPIO male connector, for connecting the main ribbon bus cable
+ 3 pin header connector, for connecting the extra audio line-out Jack connectors
4.2 PiTFT 2.8' TouchScreen customizing
If you are using the Adafruit PiTFT 2.8' TouchScreen (or a clonic version) in a standard mounting (standard main ribbon bus and case size), is highly recommended to use the side 26-pin male connector, not the bottom female connector. The main ribbon bus is designed to use the side 26-pin male connector, and the case mounting will be easier if you do so.
4.2.1 Original Adafruit TouchScreen
If you have an original Adafruit PiTFT 2.8' TouchScreen, probably you have both connectors soldered in the board, so you don't need to solder anything. Anyway, the bottom female connector is quite annoying when trying to close the case, so perhaps you want to remove it using a saw. If you do so, i also recommend to use a vice.
4.2.2 Clonic TouchScreen
If you have a clonic PiTFT 2.8' touchscreen, probably you don't have the side 26-pin male connector soldered in the board, so you should solder it by your own. Also, normally the female connector in the clonic versions is higher that in the original and more annoying yet, so, you will want to remove it with a saw. If you do so, i also recommend to use a vice.
4.3 Other Soundcards and Displays
If you are using a different soundcard or display, you'll have to see the best way to integrate it. If you do so, please, don't forget to give good feedbak in the forum or here, in the wiki.
In the forum you can see what other users have done, and of course, don't doubt to ask whatever you want!
https://discourse.zynthian.org/c/building-zynthian
