Difference between revisions of "ZynSeq User Guide"
| (16 intermediate revisions by 3 users not shown) | |||
| Line 1: | Line 1: | ||
= ZynSeq - The Zynthian Sequencer = | = ZynSeq - The Zynthian Sequencer = | ||
| − | This guide explains how to access and use the Zynthian's step sequencer called, ZynSeq. Before following the guide, add 2 synth engines to layers using MIDI channels 1 & 2 respectively. We will use these to demonstrate ZynSeq | + | This guide explains how to access and use the Zynthian's step sequencer called, ZynSeq. Before following the guide, add 2 synth engines to layers using MIDI channels 1 & 2 respectively. We will use these to demonstrate ZynSeq. |
= Accessing ZynSeq = | = Accessing ZynSeq = | ||
| Line 7: | Line 7: | ||
[[File:Sequencer pad view 2 inst.png|400px|right]] | [[File:Sequencer pad view 2 inst.png|400px|right]] | ||
| − | + | Access the sequencer as described in [[Zynthian UI User's Guide - Oram|Zynthian UI User's Guide]]. The first time you access the sequencer you will see a 4 x 4 grid of rectangles organised as 4 columns of colours. This view is called ZynPad and provides a live performance interface to ZynSeq. Each rectangle represents a pad which may be used to play a sequence. This operation is similar to clip launchers in many DAWs (e.g. Ableton) and on hardware devices (Akai APC and Novation Launchpad devices). Use of ZynPad is described later but first there are some terms that will help understand the structure of ZynSeq. | |
| + | |||
| + | '''Event'''<br> | ||
| + | An event represents a MIDI command, e.g. Note-on. It may have parameters such as velocity, duration, etc. | ||
'''Pattern'''<br> | '''Pattern'''<br> | ||
| − | A pattern | + | A pattern contains zero or more events. Each pattern has a duration in steps and may include as many simultaneous (polyphonic) notes as desired on each step. We will see how patterns are manipulated in the [[#Pattern Editor | Pattern Editor section]] |
'''Track'''<br> | '''Track'''<br> | ||
| − | A track contains | + | A track contains zero or more patterns which may be played and looped. Each track plays out to its own MIDI channel. We will see how sequences and tracks are manipulated in the [[#Arranger | Arranger section]]. |
'''Sequence'''<br> | '''Sequence'''<br> | ||
| − | A sequence contains | + | A sequence contains one or more tracks which play in unison. By default each sequence has a single track. |
'''Group''' <br> | '''Group''' <br> | ||
| − | A sequence is a member of a group (indicated by its pad colour). Several sequences may be played simultaneously but those in the same group | + | A sequence is a member of a group (indicated by its pad colour). Several sequences may be played simultaneously but those in the same group cannot play concurrently. |
| + | |||
| + | '''Bar''' <br> | ||
| + | A Bar is a musical entity. Each bar is an amount of time, with a recognised rhythm of beats Defined by Beats per Bar | ||
| + | |||
| + | '''Beat''' <br> | ||
| + | A beat is a collection of steps, and a bar is made up of a number of beats. Defined in Beats Per Minute. | ||
| + | |||
| + | '''Step''' <br> | ||
| + | A Step is a the smallest time item on the pattern display. Each sequence clock event moves this on one step. Defined by Steps/Beat | ||
| + | |||
| + | |||
<br clear=all> | <br clear=all> | ||
| + | |||
====Pad Layout==== | ====Pad Layout==== | ||
| − | Each pad displays information split into an upper and lower part. The | + | Each pad displays information split into an upper and lower part. The upper part shows the current loop setting (loop all - [[#Sequence_Modes | see Sequence Modes]]), the midi channel of the first track and the sequence identifier (A1). Currently the track uses midi channel 1 which is assigned the 'Poly Dreams' preset from the OB-xD instrument. The preset is used as the default name (it can be renamed) and shown in the lower part of the pad. This pad is currently empty. When the pad has content, a stop button icon will appear in the top right corner. When the pad has no sequence or is disabled, it displays dark grey. |
<br clear=all> | <br clear=all> | ||
<gallery mode = packed> | <gallery mode = packed> | ||
| Line 31: | Line 46: | ||
So a pad is in a group and triggers a sequence which is a collection of tracks. A track is a collection of patterns. A pattern is a collection of MIDI events. Now we need to add some sequences to play. Let's create... | So a pad is in a group and triggers a sequence which is a collection of tracks. A track is a collection of patterns. A pattern is a collection of MIDI events. Now we need to add some sequences to play. Let's create... | ||
| − | |||
| − | |||
| − | |||
| − | |||
| − | |||
| − | |||
| − | |||
| − | |||
| − | |||
<br clear=all> | <br clear=all> | ||
| Line 50: | Line 56: | ||
[[File:sequencer_pattern_editor_menu.png|right|400px]] | [[File:sequencer_pattern_editor_menu.png|right|400px]] | ||
| − | By default each pad triggers a sequence containing a single pattern. Bold | + | By default each pad triggers a sequence containing a single pattern. Bold SELECT a pad to show its Pattern Editor. |
==== Step sequences and the Step Grid ==== | ==== Step sequences and the Step Grid ==== | ||
| Line 56: | Line 62: | ||
There is a grid on the right called the ''Step Grid''. On the left is a representation of a piano keyboard, scale or drum map. Each row represents a note and each column in the step grid represents a step in the sequence. | There is a grid on the right called the ''Step Grid''. On the left is a representation of a piano keyboard, scale or drum map. Each row represents a note and each column in the step grid represents a step in the sequence. | ||
| − | + | By default, step sequences are a quantised collection of events, i.e. each event occurs at a discrete time and the available discrete times are equally and evenly distributed across the pattern. This means the difference in time between step 1 and step 2 occurring is the same as the difference in time between step 2 and step 3 occurring. It is possible to record or move events off this quantised grid which will be described later. | |
==== Navigating the Pattern Editor and Entering Notes ==== | ==== Navigating the Pattern Editor and Entering Notes ==== | ||
| − | One of the cells in the step grid has a coloured outline. This is the ''cursor'' and identifies which cell is currently highlighted. Rotate | + | One of the cells in the step grid has a coloured outline. This is the ''cursor'' and identifies which cell is currently highlighted. Rotate encoder 3 to move the cursor up and down (between notes) and encoder 4 to move the cursor left and right (between steps). To add a note, short SELECT a cell in the grid. A note may be removed in the same way. On a touchscreen, press and drag to allow more accurate positioning. As a note is added it is also sounded (MIDI sent to engine). The grid may be zoomed (simultaneous horizontal and vertial) with encoder 2 or pinch on a touchscreen. The grid will scroll when the cursor reaches an edge or with two finger drag on a touchscreen. Touching a key on the keyboard plays that note briefly. This is a useful tool for auditioning notes or phrases before adding them to the step grid. |
==== Preview, Pattern Duration and Resolution ==== | ==== Preview, Pattern Duration and Resolution ==== | ||
| − | To preview a pattern, | + | To preview a pattern, start or pause the transport by pressing the play button, learn/shot encoder or tapping the status area. A coloured bar at the bottom of the view will move left to right to indicate the position of the playhead and any notes entered in the pattern will be sent to the zynthian's engines. To stop and recue to the start of the pattern, bold press. Playback speed (Tempo) can be adjusted with the encoder 1 or by selecting "Tempo" from the menu. |
The MIDI channel used by the Pattern Editor will be chosen from the sequence / track from which it is launched, e.g. if you selected the first pad (without changing default settings) it should play on MIDI channel 1. | The MIDI channel used by the Pattern Editor will be chosen from the sequence / track from which it is launched, e.g. if you selected the first pad (without changing default settings) it should play on MIDI channel 1. | ||
| Line 70: | Line 76: | ||
There are vertical white lines indicating the beats. The quantity of beats in the pattern may be adjusted from the menu as well as the quantity of steps in each beat. This allows the duration and quantisation level of the pattern to be adjusted. Changing the beats in pattern will change the pattern duration. Changing the steps per beat will change the pattern resolution. | There are vertical white lines indicating the beats. The quantity of beats in the pattern may be adjusted from the menu as well as the quantity of steps in each beat. This allows the duration and quantisation level of the pattern to be adjusted. Changing the beats in pattern will change the pattern duration. Changing the steps per beat will change the pattern resolution. | ||
| − | Add some notes to form a melody and preview with the play function. | + | Add some notes to form a melody and preview with the play function. Navigate BACK to return to ZynPad. |
<br clear=all> | <br clear=all> | ||
| − | = Note | + | = Note Parameters = |
| − | [[File: | + | [[File:zynseq_patterneditor_notevelocity.png|right|400px]] |
| − | + | Each note may be adjusted to have different duration, velocity, etc. To adjust a note's parameters, bold SELECT to show the parameter editor. Use encoder 4 (or onscreen buttons if enabled) to select the parameter to adjust. The options are: | |
| − | |||
| − | + | * Duration: Quantity of steps at 0.1 resolution. Duration of each note is shown by the length of the event in the grid. | |
| + | * Velocity: MIDI velocity 0..127. Current velocity is shown by yellow line at bottom left of screen and the opacity of each note. The brighter the cell, the louder the note. | ||
| + | * Offset: Note position from start of step 0..100%. Position of each note is shown in the grid. | ||
| + | * Stutter count: Quantity of stutter repeats. | ||
| + | * Stutter duration: Length of stutter in ticks. | ||
| + | * Play chance: Percentage likelihood that the note will trigger. | ||
| − | + | Use encoder 3 to coarse adjust the selected parameter and encoder 2 to fine adjust. Bold SELECT to adjust all notes in the pattern. Navigate BACK to close the parameter editor. | |
| − | |||
| − | |||
| − | |||
| − | |||
<br clear=all> | <br clear=all> | ||
| Line 199: | Line 205: | ||
{| class="wikitable" | {| class="wikitable" | ||
|+ Sequence play modes | |+ Sequence play modes | ||
| + | ! Icon | ||
! Mode | ! Mode | ||
! Description | ! Description | ||
| − | |||
|- | |- | ||
! Disabled | ! Disabled | ||
| − | + | | [[File:disabled.png|center]] | |
| + | | Sequence is disabled and cannot be played | ||
|- | |- | ||
| − | ! | + | ! One-shot |
| + | | [[File:oneshot_new.png|center]] | ||
| Sequence will play once, i.e. not loop. When stopped sequence will stop immediately (this is the only mode that will stop immediately) | | Sequence will play once, i.e. not loop. When stopped sequence will stop immediately (this is the only mode that will stop immediately) | ||
| − | |||
|- | |- | ||
! Loop | ! Loop | ||
| + | | [[File:loop_new.png|center]] | ||
| Sequence will loop immediately at end of sequence. When stopped sequence will play until end of loop | | Sequence will loop immediately at end of sequence. When stopped sequence will play until end of loop | ||
| − | |||
|- | |- | ||
| − | ! | + | ! One-shot all |
| + | | [[File:oneshot_all_new.png|center]] | ||
| Sequence will play once, i.e. not loop. When stopped sequence will continue to play until end of sequence | | Sequence will play once, i.e. not loop. When stopped sequence will continue to play until end of sequence | ||
| − | |||
|- | |- | ||
! Loop all | ! Loop all | ||
| − | | Sequence will loop at end of sequence. If sequence ends before sync point it will pause and restart at next sync point (end of bar). When stopped sequence will continue to play until end of sequence | + | | [[File:loop_all_new.png|center]] |
| − | + | | Sequence will loop at end of sequence. If sequence ends before sync point it will pause and restart at next sync point (end of bar). When stopped sequence will continue to play until end of sequence. '''This is the default mode.''' | |
|- | |- | ||
| − | ! | + | ! One-shot sync |
| + | | [[File:oneshot_sync_new.png|center]] | ||
| Sequence will play once, i.e. not loop. When stopped sequence will continue to play until next sync point (end of bar) | | Sequence will play once, i.e. not loop. When stopped sequence will continue to play until next sync point (end of bar) | ||
| − | |||
|- | |- | ||
! Loop sync | ! Loop sync | ||
| + | | [[File:loop_sync_new.png|center]] | ||
| Sequence will loop at sync point. If sequence is shorter than a bar it will pause until next sync point before restarting. When stopped sequence will continue to play until next sync point (end of bar) | | Sequence will loop at sync point. If sequence is shorter than a bar it will pause until next sync point before restarting. When stopped sequence will continue to play until next sync point (end of bar) | ||
| − | |||
|} | |} | ||
| − | |||
| − | |||
All of these modes affect how sequences stop. There are currently no modes that affect how a sequence starts. If JACK transport is not running then the first sequence to be started will start immediately (and also start JACK transport). If any sequences are playing or JACK transport is rolling (e.g. because MIDI player is running) then sequences will start at the next sync point. | All of these modes affect how sequences stop. There are currently no modes that affect how a sequence starts. If JACK transport is not running then the first sequence to be started will start immediately (and also start JACK transport). If any sequences are playing or JACK transport is rolling (e.g. because MIDI player is running) then sequences will start at the next sync point. | ||
| Line 330: | Line 335: | ||
Patterns may be added to or removed from the grid by short pressing the SELECT encoder or by tapping the touchscreen. Press and drag allows more accurate positioning of a pattern. Patterns may also be moved (only with touchscreen) by click and drag action. (A pattern may not be moved to overlap an existing pattern.) | Patterns may be added to or removed from the grid by short pressing the SELECT encoder or by tapping the touchscreen. Press and drag allows more accurate positioning of a pattern. Patterns may also be moved (only with touchscreen) by click and drag action. (A pattern may not be moved to overlap an existing pattern.) | ||
| − | The pattern to be added is indicated by a number in the bottom left of the display. This may be changed by rotating the LAYER encoder. (Note: This differs from ZynPad where LAYER encoder changes the scene.) Tapping the bottom left number on a touchscreen will allow selection of the pattern | + | The pattern to be added is indicated by a number in the bottom left of the display. This may be changed by rotating the LAYER encoder. (Note: This differs from ZynPad where LAYER encoder changes the scene.) Tapping the bottom left number on a touchscreen will allow selection of the pattern. |
Horizontal scrolling will move the cursor one beat unless it meets a pattern in which case it will jump to the next available space in the timeline. If the selected pattern is too long to fit the space then it will continue to skip forward until it finds available space. | Horizontal scrolling will move the cursor one beat unless it meets a pattern in which case it will jump to the next available space in the timeline. If the selected pattern is too long to fit the space then it will continue to skip forward until it finds available space. | ||
Revision as of 11:55, 2 February 2025
1 ZynSeq - The Zynthian Sequencer
This guide explains how to access and use the Zynthian's step sequencer called, ZynSeq. Before following the guide, add 2 synth engines to layers using MIDI channels 1 & 2 respectively. We will use these to demonstrate ZynSeq.
2 Accessing ZynSeq


Access the sequencer as described in Zynthian UI User's Guide. The first time you access the sequencer you will see a 4 x 4 grid of rectangles organised as 4 columns of colours. This view is called ZynPad and provides a live performance interface to ZynSeq. Each rectangle represents a pad which may be used to play a sequence. This operation is similar to clip launchers in many DAWs (e.g. Ableton) and on hardware devices (Akai APC and Novation Launchpad devices). Use of ZynPad is described later but first there are some terms that will help understand the structure of ZynSeq.
Event
An event represents a MIDI command, e.g. Note-on. It may have parameters such as velocity, duration, etc.
Pattern
A pattern contains zero or more events. Each pattern has a duration in steps and may include as many simultaneous (polyphonic) notes as desired on each step. We will see how patterns are manipulated in the Pattern Editor section
Track
A track contains zero or more patterns which may be played and looped. Each track plays out to its own MIDI channel. We will see how sequences and tracks are manipulated in the Arranger section.
Sequence
A sequence contains one or more tracks which play in unison. By default each sequence has a single track.
Group
A sequence is a member of a group (indicated by its pad colour). Several sequences may be played simultaneously but those in the same group cannot play concurrently.
Bar
A Bar is a musical entity. Each bar is an amount of time, with a recognised rhythm of beats Defined by Beats per Bar
Beat
A beat is a collection of steps, and a bar is made up of a number of beats. Defined in Beats Per Minute.
Step
A Step is a the smallest time item on the pattern display. Each sequence clock event moves this on one step. Defined by Steps/Beat
2.1 Pad Layout
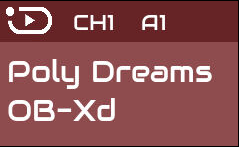
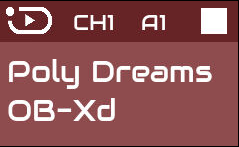
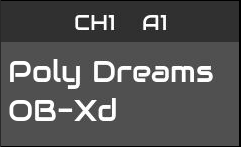
Each pad displays information split into an upper and lower part. The upper part shows the current loop setting (loop all - see Sequence Modes), the midi channel of the first track and the sequence identifier (A1). Currently the track uses midi channel 1 which is assigned the 'Poly Dreams' preset from the OB-xD instrument. The preset is used as the default name (it can be renamed) and shown in the lower part of the pad. This pad is currently empty. When the pad has content, a stop button icon will appear in the top right corner. When the pad has no sequence or is disabled, it displays dark grey.
Pad empty sequence
Pad with content in sequence (shows stop button icon)
Pad without sequence (Pad displays dark grey)


So a pad is in a group and triggers a sequence which is a collection of tracks. A track is a collection of patterns. A pattern is a collection of MIDI events. Now we need to add some sequences to play. Let's create...
3 Pattern Editor


By default each pad triggers a sequence containing a single pattern. Bold SELECT a pad to show its Pattern Editor.
3.1 Step sequences and the Step Grid
There is a grid on the right called the Step Grid. On the left is a representation of a piano keyboard, scale or drum map. Each row represents a note and each column in the step grid represents a step in the sequence.
By default, step sequences are a quantised collection of events, i.e. each event occurs at a discrete time and the available discrete times are equally and evenly distributed across the pattern. This means the difference in time between step 1 and step 2 occurring is the same as the difference in time between step 2 and step 3 occurring. It is possible to record or move events off this quantised grid which will be described later.
One of the cells in the step grid has a coloured outline. This is the cursor and identifies which cell is currently highlighted. Rotate encoder 3 to move the cursor up and down (between notes) and encoder 4 to move the cursor left and right (between steps). To add a note, short SELECT a cell in the grid. A note may be removed in the same way. On a touchscreen, press and drag to allow more accurate positioning. As a note is added it is also sounded (MIDI sent to engine). The grid may be zoomed (simultaneous horizontal and vertial) with encoder 2 or pinch on a touchscreen. The grid will scroll when the cursor reaches an edge or with two finger drag on a touchscreen. Touching a key on the keyboard plays that note briefly. This is a useful tool for auditioning notes or phrases before adding them to the step grid.
3.3 Preview, Pattern Duration and Resolution
To preview a pattern, start or pause the transport by pressing the play button, learn/shot encoder or tapping the status area. A coloured bar at the bottom of the view will move left to right to indicate the position of the playhead and any notes entered in the pattern will be sent to the zynthian's engines. To stop and recue to the start of the pattern, bold press. Playback speed (Tempo) can be adjusted with the encoder 1 or by selecting "Tempo" from the menu.
The MIDI channel used by the Pattern Editor will be chosen from the sequence / track from which it is launched, e.g. if you selected the first pad (without changing default settings) it should play on MIDI channel 1.
There are vertical white lines indicating the beats. The quantity of beats in the pattern may be adjusted from the menu as well as the quantity of steps in each beat. This allows the duration and quantisation level of the pattern to be adjusted. Changing the beats in pattern will change the pattern duration. Changing the steps per beat will change the pattern resolution.
Add some notes to form a melody and preview with the play function. Navigate BACK to return to ZynPad.
4 Note Parameters

Each note may be adjusted to have different duration, velocity, etc. To adjust a note's parameters, bold SELECT to show the parameter editor. Use encoder 4 (or onscreen buttons if enabled) to select the parameter to adjust. The options are:
- Duration: Quantity of steps at 0.1 resolution. Duration of each note is shown by the length of the event in the grid.
- Velocity: MIDI velocity 0..127. Current velocity is shown by yellow line at bottom left of screen and the opacity of each note. The brighter the cell, the louder the note.
- Offset: Note position from start of step 0..100%. Position of each note is shown in the grid.
- Stutter count: Quantity of stutter repeats.
- Stutter duration: Length of stutter in ticks.
- Play chance: Percentage likelihood that the note will trigger.
Use encoder 3 to coarse adjust the selected parameter and encoder 2 to fine adjust. Bold SELECT to adjust all notes in the pattern. Navigate BACK to close the parameter editor.
5 Scales and Drum Maps

Pattern Editor shows a piano keyboard at its left hand edge to assist with note entry. This is commonly called a piano roll referring to the punched paper rolls that were used to play automatic pianos. Selecting Scale from the menu allows this to be changed to show just the notes of particular scales. Scales include:
- Chromatic (piano keyboard)
- Major
- Minor
- Blues
- Blues pentatonic
Changing the scale from Chromatic will hide notes in the note grid and all keys on the keyboard change to white, i.e. no black keys are shown. Notes are hidden but not removed from the pattern which may result in notes not being visible. If a percussion preset or engine is selected for the current MIDI channel then an appropriate drum map is also available in the list of scales and selected by default. The name of the percussion instrument is shown on each key, e.g. Snare Drum.
Selecting Tonic from the menu allows changing the key of the scale: C, C#, D, etc.
6 Adding Notes With External MIDI Controller
It is possible to use a MIDI controller to add notes to a pattern, e.g. MIDI keyboard connected to Zynthian. Select "Input channel" from Pattern Editor menu to adjust the MIDI channel that ZynSeq listens for input. When the Pattern Editor is shown, any note sent on this channel will add a note to the pattern at the current playhead cursor position with the a duration of one step and if the pattern is not being played, move the playhead to the next step. This table summarises how to input notes with a controller:
| Input Type | Description |
|---|---|
| Add a single note | Press the keyboard (midi controller) note once. |
| Add longer notes | Press the sustain pedal whilst adding notes. Each press of a note whilst the sustain pedal is pressed will extend the note by one step. E.g. at default settings, press 4 times to create a quarter note. Release sustain pedal to start a new note. |
| Add chords | Same as adding longer notes, the playhead does not advance until the sustain pedal is released so chords may also be added whilst the sustain pedal is pressed. Release sustain pedal to start a new chord. |
| Advance the playhead | The playhead may be advanced without adding any note by pressing and releasing the sustain pedal. |
| Add (assign) a rest note | It is also possible to assign a note that acts as a rest, i.e. will not add a note to the sequence and skip to the next step. Select "Rest note" from pattern editor menu to select which note will act as a rest. None may be selected by rotating SELECT encoder to the end of the range, i.e. below C-1 or above G9. |
Loop Mode and Overdub
It is also possible to play live whist the pattern is playing in loop mode. Short press SNAPSHOT encoder to start loop playback then use MIDI controller to overdub the pattern. The same logic applies so playing a note that already exists will remove it.
7 Playing a sequence


ZynPad is the performance view. It shows each sequence as a pad. The pad has a colour representing its group and (by default) a number identifying its sequence number. (This label can be changed by selecting the menu option: "Rename sequence".) Each pad triggers a different sequence. By default there are 16 sequences, 1-16.
Navigation and Playback Functions
Each pad has an icon indicating its play mode. The default mode is Loop All. This means the pad will play the whole sequence then wait unit the next sync point / bar before starting again.
Similar to how we navigate the cursor in the Pattern Editor we can move the cursor in ZynPad with the BACK and SELECT encoders. Move the cursor to the top left to highlight pad 1 (it is probably already there) then short press SELECT encoder to start playback of sequence 1. This can also be achieved with a touchscreen by simply tapping pad 1.
Playback of the pattern you created should start to loop. During playback a green right-pointing arrow shows on the pad.
Tempo may be adjusted using the SNAPSHOT encoder or by selecting "Tempo" from the menu.
Short press SELECT or tap the pad with the touchscreen to stop the sequence playing.
The playback indication icon changes to red to indicate it is stopping and then disappears to indicate it has stopped. Most play modes will continue to play the sequence until the next sync point. A sync point may be thought of as the start or end of a bar, indeed their spacing is set using the menu option Beats per bar.
Most play modes will wait until the next sync point before starting. If you start a sequence part way though a bar then it will show an orange starting icon indicating it is waiting to start and will start at the end of this bar. This may also occur if a sequence length results in it stopping mid-bar in which case it may wait in starting state until the next bar. See section on Play Modes.
8 Multiple Sequences

So far we have edited a single pattern in one pad's sequence. Let's add patterns to other pads. By default ZynSeq has 16 pads (sequences) each with a single track with its own pattern. Use BACK and SELECT encoders to select pad 2 and bold press SELECT to show its Pattern Editor. Add a new melody to the pattern then short press BACK or touch topbar to return to ZynPad.
Start pad 1: see its play icon show green and hear its sequence loop.
Start pad 2. Pad 2 shows an orange starting icon but does not start to play yet. Pad 1's icon changes to red and continues to play. The red icon indicates sequence is playing but will soon stop. Pad 2 icon changes to green and starts playing as pad 1 stops. The behaviour occurs because these pads are in the same group (see below).
9 Groups


Each sequence belongs to a mutually exclusive group. This means that only one sequence within the same group may play concurrently. Sequences from other groups may play simultaneously. The group is indicated by the colour of the pad. There are up to 26 groups, A-Z.
By default sequences are arranged in columns of groups with the first column being in group A, second column in group B, etc. and the last column being in group J. (This is because the default configuration also allocates MIDI channels 1, 2, etc. and 10 for last column which is traditionally used for percussion.) ZynPad tries to keep things simple with each sequence containing a single track and a single pattern. We will see later how this can be changed with the Arranger view. Following this simple workflow, a sequence's MIDI channel may be set from the menu option MIDI channel. This also sets the sequence's group. There are 16 colours used to indicate groups so that each MIDI channel may have a different colour.
If you start sequence 1 then start sequence 5 you will see that pad 5 shows orange starting icon then green playing icon when the next sync point is reached whilst pad 1 continues to play.
This is a powerful performance feature of ZynPad. You can assign any quantity of sequences to any group, providing groups of mutually exclusive (only one can play at a time) sequences. Sequences from different groups can play simultaneously but sequences from the same group will play sequentially.
A Sync point is a location within playback at which sequences will loop and / or group sequential play will change to another sequence. Sync points are synonymous with bars in traditional music notation. See section on time signature.
Remember, sequences are indexed by number, 1, 2, 3, etc. and Groups by letter, A, B, C, etc. By default pad labels show the sequence number but can be renamed (see below).
10 Grid Size

By default ZynPad shows a 4 x 4 grid of 16 pads. The grid is always square, i.e. has the same quantity of columns as rows. The quantity of pads may be adjusted by selecting "Grid size" from the ZynPad menu. The maximum quantity of pads is 64 (8 x 8).
Sequences are added or removed when the grid size is selected. Any patterns are not lost but may need to be re-selected with the Arranger view (see later) when the grid size is decreased.
When the grid size is changed in ZynPad existing sequences remain in the same position. This may result in duplicate (default) names (see picture).
11 Sequence Modes
So far we have used the default mode for sequences which will loop the sequence until requested to stop at which point it will continue to play until the next sync point. There are many modes available which each offer features for different workflows / requirements. To change mode, select Play mode from the ZynPad's menu. This will allow change of mode of the highlighted sequence. The mode is indicated by an icon.
| Icon | Mode | Description |
|---|---|---|
| Disabled | Sequence is disabled and cannot be played | |
| One-shot | Sequence will play once, i.e. not loop. When stopped sequence will stop immediately (this is the only mode that will stop immediately) | |
| Loop | Sequence will loop immediately at end of sequence. When stopped sequence will play until end of loop | |
| One-shot all | Sequence will play once, i.e. not loop. When stopped sequence will continue to play until end of sequence | |
| Loop all | Sequence will loop at end of sequence. If sequence ends before sync point it will pause and restart at next sync point (end of bar). When stopped sequence will continue to play until end of sequence. This is the default mode. | |
| One-shot sync | Sequence will play once, i.e. not loop. When stopped sequence will continue to play until next sync point (end of bar) | |
| Loop sync | Sequence will loop at sync point. If sequence is shorter than a bar it will pause until next sync point before restarting. When stopped sequence will continue to play until next sync point (end of bar) |
All of these modes affect how sequences stop. There are currently no modes that affect how a sequence starts. If JACK transport is not running then the first sequence to be started will start immediately (and also start JACK transport). If any sequences are playing or JACK transport is rolling (e.g. because MIDI player is running) then sequences will start at the next sync point.
12 Sequence Names

By default each new sequence is allocated one pattern. Each pattern is identified by its index number and the sequence name is set to the value of the pattern's index. It is possible to rename each sequence. Use the menu to select Rename sequence. This shows a keyboard with the current sequence name selected. Use the BACK and SELECT encoders to navigate the cursor and short press SELECT to add the highlighted character to the name. Selecting Shift will allow the next character to be uppercase. Selecting Shift' again will lock the keyboard allowing all subsequent characters to be uppercase. Select Shift again to release shift-lock. Select Delete to remove the last character. Bold press Delete to clear the name.
Select Enter to assert the new name or Cancel to revert to the previous name.
The touchscreen may be used to select buttons on the onscreen keyboard.
13 Tempo
Tempo is the rate at which the sequencer plays back notes measured in beats per minutes (BPM). By default ZynSeq plays sequences at 120 BPM. Adjust Tempo with the SNAPSHOT encoder. The tempo is briefly displayed in the title bar. There is also a menu option to adjust tempo.
The current tempo is saved and loaded with each snapshot.
ZynSeq allows tempo to be adjusted from 1.0 BPM to 420.0 BPM in 0.1 BPM steps. Tempo may also be altered by external modules, e.g. MIDI player.
14 MIDI channels
Each sequence may have one or more tracks and each track may be assigned to any of the 16 MIDI channels. By default each sequence has a single track. The ZynPad menu allows setting of the MIDI channel of the first track of the highlighted sequence. (This also sets the sequence's group.) If there is a chain associated with the MIDI channel then the name of the currently selected preset of the chain is displayed in the topbar as MIDI channel is selected.
See Arranger section for detail of setting MIDI channels for multi-track sequences.
15 Scenes
There are many scenes of grids. Each scene contains a set of sequences. Different scenes may have different quantity of sequences. Sequence 1 in scene 1 is different to sequence 1 in scene 2. Up to 64 scenes may be configured. Scenes may be selected from ZynPad using the LAYER encoder or by selecting Scene in the menu.
A scene may be considered a view or page of sequences / pads and allows more than 64 sequences to be configured, e.g. 2 pages of 8 x 8 grids provides 128 sequences.
Scenes may be cleared and reset to default 4 x 4 grid from the Arranger menu.
If any sequences are playing when changing scene, they continue to play.
16 Save / Load / Snapshot
Patterns, sequences and scenes are saved within the snapshot and restored when a snapshot is loaded. There is also a method of exporting to and importing from standard MIDI file. See section on Import / Export MIDI Files
17 External Trigger
It is possible to trigger a sequence from a MIDI controller, e.g. a MIDI keyboard connected to the Zynthian.
To set the channel that ZynSeq listens for triggers, select Trigger channel from the menu.
Each sequence may be triggered by a MIDI note. Select "Trigger note" from the menu to adjust the MIDI note that will trigger the highlighted pad. Note may be selected with the SELECT encoder or by playing a note on an external controller on the MIDI trigger channel. By default triggers are disabled. To disable a sequence from being triggered set its trigger value to None which is below C-1 or above G9, i.e. increase to maximum value.
ZynSeq will send MIDI note on messages to represent the current play status of each sequence with play state represented by MIDI note velocity. This may be used by an external pad controller like Novation's Launchpad, Akai APC, etc. to indicate the status of a sequence. The note number sent is the same as the external trigger configured for a sequence. Tallies are sent on the same MIDI channel as configured to receive triggers. Currently only the following tallies are configured which will work with Akai APC:
| State | MIDI velocity |
|---|---|
| Stopped | 3 |
| Starting | 5 |
| Playing | 1 |
| Stopping | 4 |
It is not currently possible to change this configuration and tallies will always be sent if trigger is configured.
18 Arranger


The Arranger is a view that allows the manipulation of sequences used by pads. This is where ZynSeq expands beyond a straightforward clip launcher (e.g. Ableton session view). To remind again: Each pad triggers a sequence which may contain one or more tracks. Each track may contain one or more patterns.
By default each sequence contains a single track with a single pattern (such as a bass line or drum rhythm) but it is possible to create more complex arrangements by adding more patterns to tracks (e.g. intro bass, verse bass) and more tracks to sequences (lead, drums, bass).
Said another way: each pad could for example contain a lead, bass and drum track. Now this pad is launching three tracks instead of one. Each track could contain an intro, verse and chorus patterns which will play in the arrangement you choose. This is just one way to configure a pad with Arranger, see Example Workflows for more.
18.1 Accessing Arranger View and Understanding The Layout
The Arranger is accessed from the menu. Bold press SELECT in ZynPad will also open arranger if the sequence is already configured with more than one track or pattern or the first pattern is not at start of sequence. Arranger shows each track as a row with its patterns shown as black boxes (with their pattern number in white) on a time line. Tracks are grouped within their sequence. This should be familiar to users of Digital Audio Workstations (DAW). The left hand column shows the sequence and track titles. This includes:
- Sequence name, e.g. A1
- Track number, e.g. 1
- Name of the instrument currently assigned to the MIDI channel, e.g. Piano
The background colour of the title matches the group.
The selection cursor may be moved around the grid of patterns by rotating the BACK and SELECT encoders. Information about the currently selected track is shown in the topbar, e.g. Scene 1 A2-1 (3) shows that track 1 in sequence 2 of scene 1 is in group A and sends to MIDI channel 3. Each horizontal division represents a beat. Moving the cursor beyond the edge of the screen will scroll to show more of the scene.
Patterns may be added to or removed from the grid by short pressing the SELECT encoder or by tapping the touchscreen. Press and drag allows more accurate positioning of a pattern. Patterns may also be moved (only with touchscreen) by click and drag action. (A pattern may not be moved to overlap an existing pattern.)
The pattern to be added is indicated by a number in the bottom left of the display. This may be changed by rotating the LAYER encoder. (Note: This differs from ZynPad where LAYER encoder changes the scene.) Tapping the bottom left number on a touchscreen will allow selection of the pattern.
Horizontal scrolling will move the cursor one beat unless it meets a pattern in which case it will jump to the next available space in the timeline. If the selected pattern is too long to fit the space then it will continue to skip forward until it finds available space.
The view may be zoomed horizontally and vertically using options in the menu. The zoom level indicates the quantity of rows or columns displayed, i.e. setting vertical zoom to 8 will show 8 rows (tracks) whilst setting horizontal zoom to 64 will show 64 beats.
18.3 Adding Tracks and Adjusting Sequences
New tracks may be added to each sequence by highlighting a sequence track then using menu option Add track. This adds an empty track directly below the selected track, inserting between tracks if necessary. Tracks may be removed by highlighting the track then using the menu option Remove track. Tracks may be selected (without adding a pattern) by tapping the track title on a touchscreen or by rotating the BACK encoder.
A track's MIDI channel may be set by highlighting the track then selecting MIDI channel from the menu. The instrument name is also shown during channel selection.
The quantity of sequences in the scene may be adjusted using the Grid size menu option. This allows selection of 1, 4, 9, 16, 25, 36, 49 or 64 sequences but does not change the MIDI channel of any tracks or group of any sequences. This may be undesirable if you use ZynPad as a column based performance tool in which case it may be more appropriate to change grid size from ZynPad menu.
The group, play mode and trigger note of each sequence can be adjusted from the menu.
A sequence may be cleared, resetting to a single track with no patterns using the Clear sequence menu option.
The displayed scene may be changed from the menu and a scene can be cleared, resetting to 4 x 4 grid using the Clear scene menu option.
18.4 Mute and Play Mode Options
Each track may be muted by highligting the track then bold SNAPSHOT or using Mute track menu option. The patterns within the track turn grey and will not play when the sequence is playing.
A sequence play state may be toggled with short press SNAPSHOT. A vertical playhead line will show the current play position within each playing sequence. The screen will horizontal scroll as required to follow the currently highlighted track. Selection cursor will also move to remain in view.
By setting a sequence play mode to Oneshot and adding several tracks one may use the sequencer like a traditional, song-based MIDI step sequencer, similar to a DAW.
19 Time Signature
Zynthian allows the beats per bar to be configured but not the beat type. All beats are assumed to be quarter notes and the default beats per bar is 4, hence a 4/4 time signature. The beats per bar may be adjusted from a menu option and can be set to any value between 1 and 64. The most significant behaviour that beats per bar influences is the sync point. The sync point is the point at which a sequence starts, loops or stops and is synonymous with start of bar hence the beats per bar defines the quantity of beats between sync points which in turn defines the rate at which sequences will loop.
The current value of beats per bar is saved with the snapshot and restored when a snapshot is loaded. The beats per bar may also be varied during sequence playback and will be added to a sequence within the arranger. This functionality is currently disabled.
20 Metronome
There is no metronome currently available in ZynSeq but you can create a click pattern in a sequence then start it looping then edit other patterns.
21 Pattern Management

Patterns are identified by their number. There may be a maximum of 999 patterns in each snapshot. Each pattern may be used as many times as required in as many tracks and sequences as required.
A pattern may be cleared, copied or transposed by selecting the corresponding entry it the pattern manager menu:
- Clearing a pattern will remove all notes in the pattern after requesting confirmation.
- Copying a pattern will copy all the notes and parameters of a pattern, overwriting the destination pattern after requesting confirmation. Remember that the pattern being overwriten may be used in various sequences.
- Transposing a pattern moves all notes up or down a semitone at a time. Transpose is constrained to the MIDI range C-1 to G9. If any note in the pattern would be beyond this range then further transposing is prohibited. Transposing is only available when chromatic scale is used, i.e. drum maps cannot be transposed.
New patterns are created on demand, e.g. if a new sequence is added in ZynPad it will be assigned a single track with a single pattern. The pattern will be the first unused, empty pattern available. This means that even if a pattern is removed from tracks, e.g. because a track or sequence is removed the pattern will remain available to select and reuse.
Only populated patterns are saved to snapshots. This may mean that a pattern that has its Step per beat and Beats in pattern configured but contains no notes will be treated as empty and disgarded.
22 Import / Export MIDI Files
The MIDI Association defines a specification for storing MIDI events within a file. This is called Standard MIDI Files (SMF) Specification. ZynSeq provides methods to exchange patterns and sequences using SMF.
22.1 Export
A pattern may be exported as a standard MIDI file. The tempo and all the notes within the pattern on its current channel will be exported to a file in Zynthian's capture location which may be accessed via webconf. The filename will consist of the pattern number and a date / time stamp of when the export occured, e.g. pattern2_2021-02-18 15:15:19.335558.mid.
22.2 Import
There are some excellent percussion patterns available in MIDI File Format. Zynthian offers the ability to import such files into ZynSeq sequences. Upload a standard MIDI file using webconf Library->Capture. Within Arranger highlight the sequence into which you wish to import the SMF. Select menu option Import SMF which will show a file selector looking at Zynthian's capture location. Select the required file. Each MIDI channel within the SMF will create a track in the sequence. Each track will be populated with notes from the SMF. Program changes will be added to each track. Tempo changes will be added to the sequence's timebase track. New patterns will be created as required, starting at the next available pattern above the highest populated pattern, e.g. if you have already populated patterns 1,5 & 12 then import will start populating patterns from 13, using as many patterns as required by the import. Patterns will have an appropriate quantisation level (steps per beat) to accommodate the the rhythm.
23 Timebase
ZynSeq uses JACK timebase for its timing. Transport control and adjustment of tempo may be made by external JACK clients. Those clients may also use the same timebase. This means that ZynSeq can synchronise with other modules within Zynthian, e.g. synth engine LFO, arpeggiators, etc. It also means that other modules may control ZynSeq playback to some degree. ZynSeq acts as the timebase master, i.e. the concept of bars, beats and ticks (fractions of beats) and consequently tempo (BPM) is provided by ZynSeq. There is currently no mechanism to lock to external MIDI clock but a Zynthian MIDI effects layer may be used to create MIDI clock output. There is a plan to improve this support in a future update.
Note that if a module alters the transport, e.g. stops it then ZynSeq may have unexpected behaviour. Check what engines are doing if you experience timing or playback issues.
Each sequence has a timebase track which may have tempo and time signature (beats per bar) events. These will influence all playback. The ability to manipulate sequence timebase events is not yet implemented.
24 User Interface Settings for Touchscreen/Headless Setups


Zynthian contains a setting to show onscreen buttons. With this setting turned on, Zynthian will show the onscreen buttons after selecting certain menu items. This allows adjustments of parameters using the touchscreen interface. This is useful especially for users running Zynthian with only a touchscreen and/or VNC connection.
The option is available in the Zynthian web configuration (webconf) from the Interface -> UI Options menu as shown in the image.

The images on the right show the onscreen buttons (along the bottom) and parameter adjustment (top left of the screen) after selecting a menu option. Use the numbers to change the parameter as required and tap OK to accept the change. These two examples show the buttons are available to adjust the MIDI channel of the first pad in ZynPad view and for setting the number of beats in the bar in the pattern editor.
24.1 Controlling the Interface With a Qwerty Keyboard or MIDI Device with CUIA: Callable UI Actions
Zynthian can be controlled with either a USB keyboard or MIDI controller, a list of controls can be found here.
25 Example Workflows
ZynSeq is a flexible and powerful performance tool which can be used in various ways. This single module provides many workflows that have traditionally been provided by different devices. Here are some workflows that can be facilitated by ZynSeq.
25.1 Live looping pads
By default ZynPad is configured to provide columns of grouped sequences. This allows patterns to be looped with each column acting like one instrument, stopping previously playing sequences when they start. The parallel lanes gives simultaneous control over several instruments.
Sequences may be configured to stay synchronised with shorter phrases pausing and starting again at start of bar or polymeters may be implemented with shorter patterns driftting across longer ones.
25.2 Oneshot phrases
Not all genres or scenarios require looped sequences. You can configure sequences to be oneshot and fire them off as required during performance. This may provide short phrases that are part of a song, e.g. complex arrangements or simply phrases that need to play in parallel. (You only have so many hands!) This may also be used to trigger sequences of sound effect for dramatic performances, e.g. triggering a sample player to play a window smash followed by a scream and the sound of rain.
25.3 Linear song
An old school sequencer or drum machine as well as current DAWs have the concept of a song that plays several tracks simultaneously from start to end. By adding several tracks to a sequence and setting the sequence play mode to Oneshot this workflow can be used. The song may be started by tapping the relevant pad in ZynPad. Several songs can be created, one sequence per song and triggered as required from ZynPad. Songs can be daisy-chained with one song starting when the previous song ends by using the same group for each sequence.
25.4 Combined Linear Song and looping pads
The previous workflows may be combined, e.g. by placing the song on a pad that is used to start the linear song then having loops and oneshots on other pads (in other groups) that may be played live alongside the linear song.
25.5 Synchronisation
You may wish to use one sequence as a click track by having a simple percusion sound looping. You could use a similar track in oneshot mode as the count-in for a song, pressing pads for the first bars of the song whilst the count-in playing or maybe use a silent sequence for the same purpose to allow manual synchronisation of several sequences at the start of a performance.