Difference between revisions of "Adding Extra I/O with the Zynaptik Module"
| (32 intermediate revisions by 3 users not shown) | |||
| Line 1: | Line 1: | ||
| + | === Introduction === | ||
| − | The Zynaptik | + | The zynaptik module provides: |
| + | |||
| + | * 3 x standard MIDI ports (IN, OUT, THRU) | ||
| + | * 16 x digital Input/Output | ||
| + | * 4 x Analog Input | ||
| + | * 4 x Analog Ouput | ||
| + | |||
| + | Latest ''Zynaptik-3 Extended'' modules (from 2022-03-10): | ||
| + | |||
| + | [[File:Zynaptik3_top.jpg|900px]] | ||
| + | |||
| + | and ''Zynaptik-2'' modules (from 2021-04-01): | ||
| + | |||
| + | [[File:Zynaptik2_top.jpg|900px]] | ||
| + | |||
| + | include everything soldered on and they are ready to work. | ||
| + | |||
| + | In the other hand, '''older modules''' (before 2021-04-01) only have the MIDI circuitry soldered on. For enjoying all the functionality (analog i/o) you must solder some parts. You can [https://shop.zynthian.org/shop/product/zynaptik-expander-kit-379 buy the Zynaptik Expander Kit] or order the parts by yourself. | ||
[[File:Zynaptik_top.jpg|900px]] | [[File:Zynaptik_top.jpg|900px]] | ||
| + | {{NoteBox|The ''Zynaptik-3 Standard'' module doesn't include the analog input/output chips (ADS1115 & MCP4327), including only the MIDI circuitry and the MCP3017 GPIO expander for connecting the 4 rotary encoders with switch.}} | ||
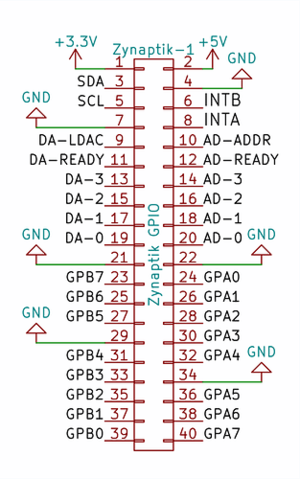
[[File:Zynaptik_40pin_header.png|300px|right]] | [[File:Zynaptik_40pin_header.png|300px|right]] | ||
| + | These are the ICs used by the Zynaptik: | ||
'''+ Secondary MCP23017 (Digital I/O):''' It uses I2C address 0x21 and the 2 interrupt lines are connected to the RBPi GPIO. INTA to GPIO27 (pin 36) and INTB to GPIO25 (pin 37). The digital I/O are labelled as GPAx & GPBx on the Zynaptik's header schematic. | '''+ Secondary MCP23017 (Digital I/O):''' It uses I2C address 0x21 and the 2 interrupt lines are connected to the RBPi GPIO. INTA to GPIO27 (pin 36) and INTB to GPIO25 (pin 37). The digital I/O are labelled as GPAx & GPBx on the Zynaptik's header schematic. | ||
| Line 13: | Line 33: | ||
'''+ ADS1115 (MOD-1 Analog Input):''' It uses I2C address 0x48 by default. The 4 analog input pins are labelled as ADx on the Zynaptik's header schematic. | '''+ ADS1115 (MOD-1 Analog Input):''' It uses I2C address 0x48 by default. The 4 analog input pins are labelled as ADx on the Zynaptik's header schematic. | ||
| − | You can assign the Analog Inputs to MIDI events like Pitch-Bending, CC or ChanPress. | + | The voltage range is 0-5V. You can assign the Analog Inputs to MIDI events like Pitch-Bending, CC or ChanPress and use the analog signals for controlling any sound parameter. Analog Inputs can be combined with digital inputs from the MCP23017, allowing to configure up to 4 x CV/Gate-IN interfaces. |
| + | |||
| + | '''+ MCP4728 (MOD-2 Analog Output):''' It uses different I2C address (0x60/0x61/0x64) depending of the zynaptik model. The 4 analog output pins are labelled as DAx on the Zynaptik's header schematic. | ||
| + | |||
| + | The voltage range is 0-5V. You can assign MIDI events, like Pitch-Bending, CC or ChanPress, to the Analog Outputs. Analog Outputs can be combined with digital outputs from the MCP23017, allowing to configure up to 4 x CV/Gate-OUT interfaces. | ||
| + | |||
| + | <br clear=all> | ||
| + | |||
| + | === Installing Zynaptik-1 Expander Kit === | ||
| + | |||
| + | [[File:Zynaptik_kit_insert_header.png|300px|right]] | ||
| + | |||
| + | The core Zynthian kit is designed to allow novice to build a full device. Beware that installing the "Zynaptik-1 Expander Kit" is more challenging, requiring some electronic construction skills including soldering and cutting. An intermediate hobbyist should be able to tackle the installation. | ||
| + | |||
| + | Insert one of the 10-pin 90 degree headers into the ADS1115 module. The pins go into the component side of the PCB extended through to the solder side. The ADS1115 is on the bent pin side of the header's plastic strip, not the straight pin side. | ||
| + | |||
| + | <br clear=all> | ||
| + | |||
| + | [[File:Zynaptik_kit_cut_pins.png|300px|right]] | ||
| + | |||
| + | Ensure the header is pushed against the ADS1115 module then solder the 10 pins. It may be easiest to locate the module tightly against the header by soldering one pin first then reflowing the solder (reapply the iron) and relocating the module into position then soldering the remaining pins. Be careful to avoid prolonged (approx. 2s) heat applied to each pin. | ||
| + | Use a small side cutter to cut each of the 10 pins flush with the top of the solder joint. Make the pins as short as you can without reducing mechanical integrity, approx. 2mm. | ||
| + | |||
| + | Repeat for the MCP4728 module. You should now have two modules with 90 degree header pins on their edge. | ||
| + | |||
| + | <br clear=all> | ||
| + | |||
| + | [[File:Zynaptik_kit_MCP23017_pin1.png|300px|right]] | ||
| + | |||
| + | If your Zynaptik-1 board is installed in your Zynthian, remove all the cables from the Zynaptik-1 board then remove the board from the case by removing the four fixing screws. | ||
| + | |||
| + | It is advised to use a 28-pin IC socket (not supplied) to mount the MCP23017 chip. This will reduce the risk of damage to the chip. Be aware that 28 pin sockets are available in different sizes. The dual-in-line narrow socket is required. You may solder the IC directly to the PCB if preferred. (You may use two 14-pin sockets (or another combination) if you do not have a 28 pin socket.) Insert the IC socket or the MCP23017 into the Zynaptik-1 board. The socket should have a notch or indicator at one end. The MCP23017 has a dot near pin 1. This should be oriented towards the edge of the PCB. There is an outline of the IC drawn on the PCB with a notch in one end. This should align with the notch of the socket and the dot of the MCP23017. The component should sit on the same side of the Zynaptik-1 board as the other components like the header pins. | ||
| + | |||
| + | Solder the socket or MCP23017 in place. Use the previous tip of soldering one pin first then reflowing to ensure the component is fitted snug against the board. WARNING: If soldering the MCP23017 directly to the PCB be careful to apply heat for a very short period (approx. 2s) to each pin. Integrated circuits are fragile and can be damaged by heat. Tip: The MCP23017 is supplied inserted in a piece of foam. Use this to support the IC socket or MCP23017 whilst soldering. | ||
| + | |||
| + | Insert the 40 pin header into the PCB with the short pins extending from the component side, through the PCB so that the plastic base sits on top of the component side of the PCB with its longer pins pointing up above the component side. It does not matter which way round this is inserted. Solder the short pins to the PCB. | ||
| + | |||
| + | <br clear=all> | ||
| + | |||
| + | [[File:MCP4728_pin1.png|300px|right]] | ||
| + | |||
| + | Identify pin 1 on the ADS1115 module. This is indicated with the letter 'V' on the PCB. | ||
| + | |||
| + | [[File:Zynaptik_kit_child_boards.png|300px|right]] | ||
| − | '' | + | Insert the ADS1115 module into the Zynaptik-1 board from the component side with its pin 1 ('V') inserted into the hole with the square line around it, nearest the label, "MOD-1". Insert the MCP4728 module into the Zynaptik-1 board from the component side with its pin 1 ('V') inserted into the hole with the square line around it, nearest the label, "MOD-2". |
| − | + | Support the modules with your fingers whilst turning the board over then solder the 10 pins of each board. Be careful to avoid prolonged (approx. 2s) heat applied to each pin. | |
| + | If using an IC socket, insert the MC23017 into the socket. This can be awkward because the pins may splay too far. Gently locate all 14 pins on one side of the MC23017 in the jaws of the socket then supporting the whole of the MC23017 with your fingers press to bend the pins slightly to locate the other row of 14 pins in their corresponding socket jaws. Only when all 28 pins are located, gently but firmly press the MC23017 into the socket with even pressure over the whole chip. | ||
| − | + | Install the Zynaptik-1 board into the Zynthian. Use a 40 pin IDC DIL connector with ribbon cable to extend the "Zynaptik-1" connector through the slot in the front of the Zynthian case. You will need to build your own external hardware interface. | |
<br clear=all> | <br clear=all> | ||
| Line 35: | Line 99: | ||
After saving, you may want to configure your switches and/or analog inputs. | After saving, you may want to configure your switches and/or analog inputs. | ||
| + | |||
| + | <br clear=all> | ||
=== Configuring Zynaptik Customizable Switches === | === Configuring Zynaptik Customizable Switches === | ||
| − | Simply add the | + | [[File:Zynthian_webconf_wiring_01.png|600px|right]] |
| − | After saving, | + | |
| + | Simply add the extra desired pins to the list (Switches Pins). Zynaptik's digital pins start at 200. | ||
| + | You don't need to add all the 16 available switches: | ||
| + | |||
| + | * If you only want to use 2, simply add "'''200,201'''" | ||
| + | * If you want to use 8, add "'''200,201,202,203,204,205,206,207'''" | ||
| + | |||
| + | After saving, the extra custom switches will be available for configuration. | ||
<br clear=all> | <br clear=all> | ||
| Line 50: | Line 123: | ||
<br clear=all> | <br clear=all> | ||
| + | |||
| + | |||
| + | === Configuring Zynaptik for Testing 21/08/2021 === | ||
| + | |||
| + | With the testing branch selected. | ||
| + | |||
| + | Add the 201 to 20... lines as described in the above. | ||
| + | This will generate the variables for these pins which will be picked up by the zynthian and will be configurable in the webconf interface. | ||
| + | |||
| + | |||
| + | [[File:Successful testing zynaptik in.png|600px|right]] | ||
| + | |||
| + | Notice: | ||
| + | No zynaptik component selected in the Wiring Option. | ||
| + | No Switches pins above 200 defined. | ||
| + | Interrupts default (27/25). | ||
| + | Zynaptik Config: | ||
| + | [[File:Zynaptic config wyleu-pedal.png|600px|right]] | ||
| + | |||
| + | <br clear=all> | ||
| + | |||
| + | This is for a machine with AtoD input module (ADS1115) but no output module (MCP4728). | ||
| + | It is used to | ||
| + | <br clear=all> | ||
| + | |||
| + | ===Connect up to 4 Control pedals=== | ||
| + | |||
| + | The zynaptik Analogue inputs can be used to generate MIDI CC control from a Standard Control Pedal. | ||
| + | |||
| + | [[File:IMG 20210825 165908.jpg|600px|right]] | ||
| + | |||
| + | [[File:Zynaptik control deal input settings.png|600px|right]] | ||
| + | |||
| + | |||
| + | <br clear=all> | ||
| + | |||
| + | ===Eight digital input switches selecting Program Change events=== | ||
| + | |||
| + | Eight Momentary switches can be connected to the Zynaptik Digital INput pins and allocated to generate Programme Change Events. | ||
| + | |||
| + | |||
| + | [[ File:Wyleu pedalboard program change switches.jpg|600px|right]] | ||
| + | |||
| + | [[File:Zynaptik config analog in.png| 600px| right]] | ||
Latest revision as of 00:32, 11 March 2022
1 Introduction
The zynaptik module provides:
- 3 x standard MIDI ports (IN, OUT, THRU)
- 16 x digital Input/Output
- 4 x Analog Input
- 4 x Analog Ouput
Latest Zynaptik-3 Extended modules (from 2022-03-10):
and Zynaptik-2 modules (from 2021-04-01):
include everything soldered on and they are ready to work.
In the other hand, older modules (before 2021-04-01) only have the MIDI circuitry soldered on. For enjoying all the functionality (analog i/o) you must solder some parts. You can buy the Zynaptik Expander Kit or order the parts by yourself.
Note:
The Zynaptik-3 Standard module doesn't include the analog input/output chips (ADS1115 & MCP4327), including only the MIDI circuitry and the MCP3017 GPIO expander for connecting the 4 rotary encoders with switch.
These are the ICs used by the Zynaptik:
+ Secondary MCP23017 (Digital I/O): It uses I2C address 0x21 and the 2 interrupt lines are connected to the RBPi GPIO. INTA to GPIO27 (pin 36) and INTB to GPIO25 (pin 37). The digital I/O are labelled as GPAx & GPBx on the Zynaptik's header schematic.
You can use it for adding up to 16 extra switches to your zynthian.
+ ADS1115 (MOD-1 Analog Input): It uses I2C address 0x48 by default. The 4 analog input pins are labelled as ADx on the Zynaptik's header schematic.
The voltage range is 0-5V. You can assign the Analog Inputs to MIDI events like Pitch-Bending, CC or ChanPress and use the analog signals for controlling any sound parameter. Analog Inputs can be combined with digital inputs from the MCP23017, allowing to configure up to 4 x CV/Gate-IN interfaces.
+ MCP4728 (MOD-2 Analog Output): It uses different I2C address (0x60/0x61/0x64) depending of the zynaptik model. The 4 analog output pins are labelled as DAx on the Zynaptik's header schematic.
The voltage range is 0-5V. You can assign MIDI events, like Pitch-Bending, CC or ChanPress, to the Analog Outputs. Analog Outputs can be combined with digital outputs from the MCP23017, allowing to configure up to 4 x CV/Gate-OUT interfaces.
2 Installing Zynaptik-1 Expander Kit
The core Zynthian kit is designed to allow novice to build a full device. Beware that installing the "Zynaptik-1 Expander Kit" is more challenging, requiring some electronic construction skills including soldering and cutting. An intermediate hobbyist should be able to tackle the installation.
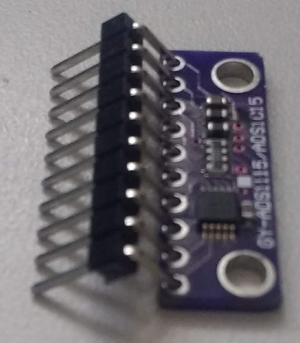
Insert one of the 10-pin 90 degree headers into the ADS1115 module. The pins go into the component side of the PCB extended through to the solder side. The ADS1115 is on the bent pin side of the header's plastic strip, not the straight pin side.
Ensure the header is pushed against the ADS1115 module then solder the 10 pins. It may be easiest to locate the module tightly against the header by soldering one pin first then reflowing the solder (reapply the iron) and relocating the module into position then soldering the remaining pins. Be careful to avoid prolonged (approx. 2s) heat applied to each pin. Use a small side cutter to cut each of the 10 pins flush with the top of the solder joint. Make the pins as short as you can without reducing mechanical integrity, approx. 2mm.
Repeat for the MCP4728 module. You should now have two modules with 90 degree header pins on their edge.
If your Zynaptik-1 board is installed in your Zynthian, remove all the cables from the Zynaptik-1 board then remove the board from the case by removing the four fixing screws.
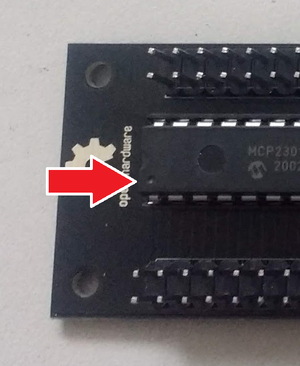
It is advised to use a 28-pin IC socket (not supplied) to mount the MCP23017 chip. This will reduce the risk of damage to the chip. Be aware that 28 pin sockets are available in different sizes. The dual-in-line narrow socket is required. You may solder the IC directly to the PCB if preferred. (You may use two 14-pin sockets (or another combination) if you do not have a 28 pin socket.) Insert the IC socket or the MCP23017 into the Zynaptik-1 board. The socket should have a notch or indicator at one end. The MCP23017 has a dot near pin 1. This should be oriented towards the edge of the PCB. There is an outline of the IC drawn on the PCB with a notch in one end. This should align with the notch of the socket and the dot of the MCP23017. The component should sit on the same side of the Zynaptik-1 board as the other components like the header pins.
Solder the socket or MCP23017 in place. Use the previous tip of soldering one pin first then reflowing to ensure the component is fitted snug against the board. WARNING: If soldering the MCP23017 directly to the PCB be careful to apply heat for a very short period (approx. 2s) to each pin. Integrated circuits are fragile and can be damaged by heat. Tip: The MCP23017 is supplied inserted in a piece of foam. Use this to support the IC socket or MCP23017 whilst soldering.
Insert the 40 pin header into the PCB with the short pins extending from the component side, through the PCB so that the plastic base sits on top of the component side of the PCB with its longer pins pointing up above the component side. It does not matter which way round this is inserted. Solder the short pins to the PCB.
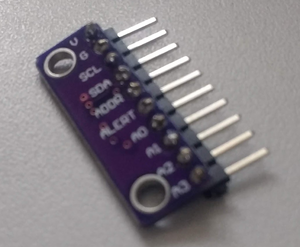
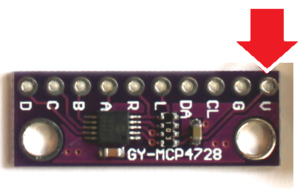
Identify pin 1 on the ADS1115 module. This is indicated with the letter 'V' on the PCB.
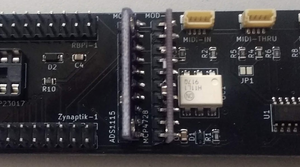
Insert the ADS1115 module into the Zynaptik-1 board from the component side with its pin 1 ('V') inserted into the hole with the square line around it, nearest the label, "MOD-1". Insert the MCP4728 module into the Zynaptik-1 board from the component side with its pin 1 ('V') inserted into the hole with the square line around it, nearest the label, "MOD-2".
Support the modules with your fingers whilst turning the board over then solder the 10 pins of each board. Be careful to avoid prolonged (approx. 2s) heat applied to each pin.
If using an IC socket, insert the MC23017 into the socket. This can be awkward because the pins may splay too far. Gently locate all 14 pins on one side of the MC23017 in the jaws of the socket then supporting the whole of the MC23017 with your fingers press to bend the pins slightly to locate the other row of 14 pins in their corresponding socket jaws. Only when all 28 pins are located, gently but firmly press the MC23017 into the socket with even pressure over the whole chip.
Install the Zynaptik-1 board into the Zynthian. Use a 40 pin IDC DIL connector with ribbon cable to extend the "Zynaptik-1" connector through the slot in the front of the Zynthian case. You will need to build your own external hardware interface.
3 Configuring the Zynaptik Module from the Webconf
First, you should choose the right configuration for your zynaptik module depending on the extra modules you have soldered on it:
- 16xSWITCH => Only MCP23017, use the 16 GPIOs as customizable switches
- 4xAD => Only ADS1115 (use the 4 ADs for Analog Input, obvious)
- 16xSWITCH + 4xAD => MCP23017 + ADS1115, use the 16 GPIOs as customizable switches
After saving, you may want to configure your switches and/or analog inputs.
4 Configuring Zynaptik Customizable Switches
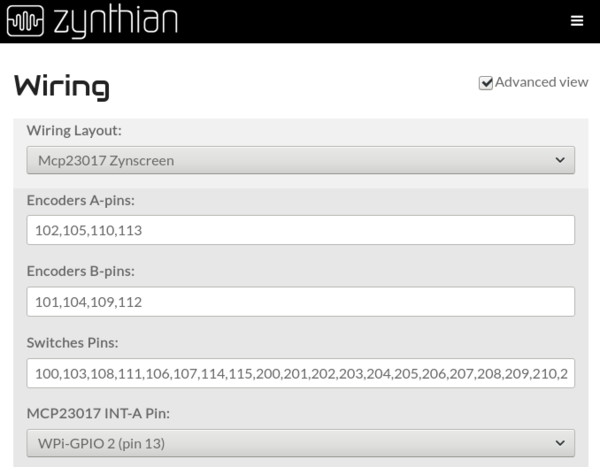
Simply add the extra desired pins to the list (Switches Pins). Zynaptik's digital pins start at 200. You don't need to add all the 16 available switches:
- If you only want to use 2, simply add "200,201"
- If you want to use 8, add "200,201,202,203,204,205,206,207"
After saving, the extra custom switches will be available for configuration.
5 Configuring Zynaptik Analog Input
Simply configure your analog inputs from the webconf's wiring section in the same way you configure your custom switches.
6 Configuring Zynaptik for Testing 21/08/2021
With the testing branch selected.
Add the 201 to 20... lines as described in the above. This will generate the variables for these pins which will be picked up by the zynthian and will be configurable in the webconf interface.
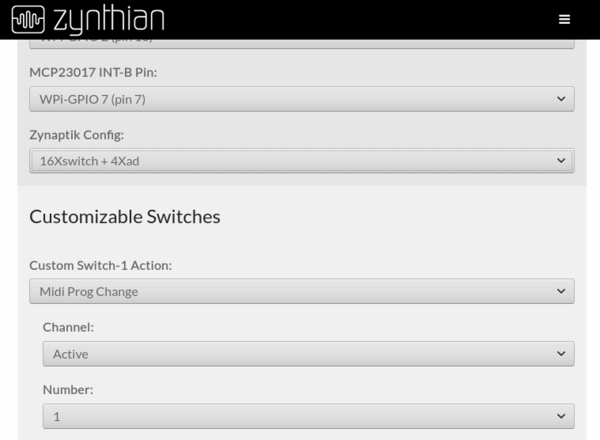
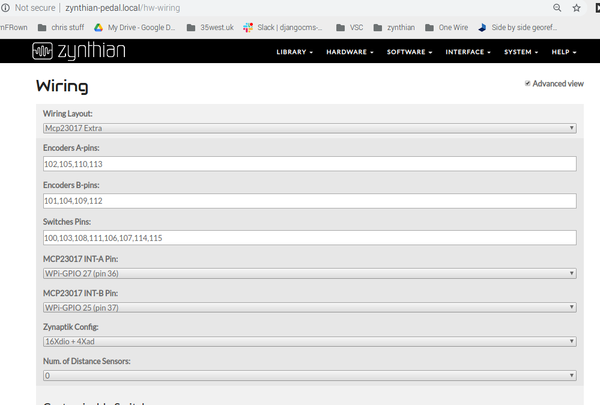
Notice: No zynaptik component selected in the Wiring Option. No Switches pins above 200 defined. Interrupts default (27/25). Zynaptik Config:
This is for a machine with AtoD input module (ADS1115) but no output module (MCP4728).
It is used to
7 Connect up to 4 Control pedals
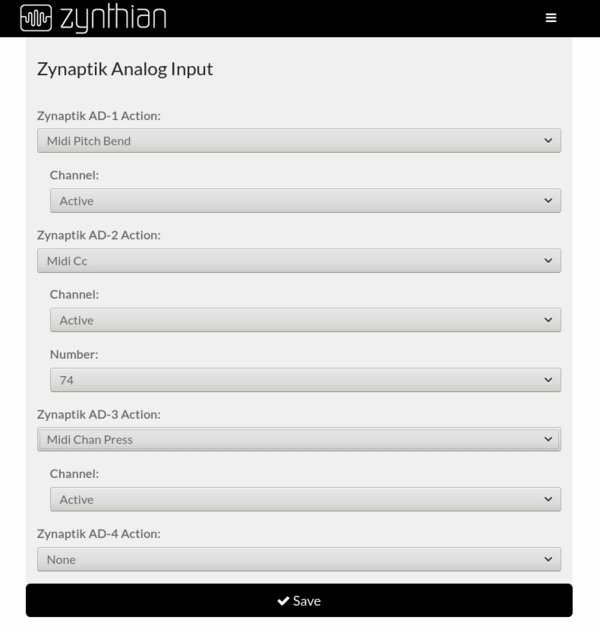
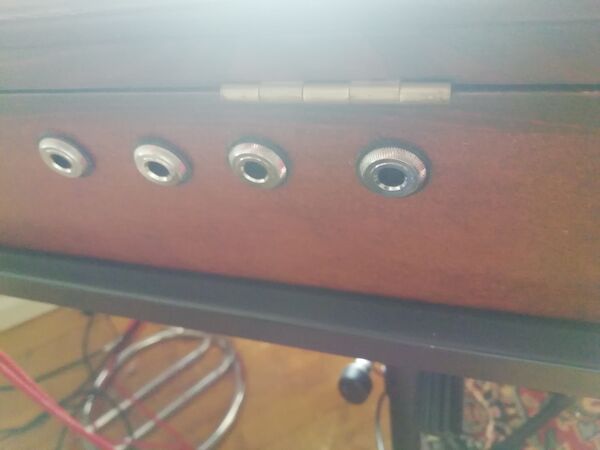
The zynaptik Analogue inputs can be used to generate MIDI CC control from a Standard Control Pedal.
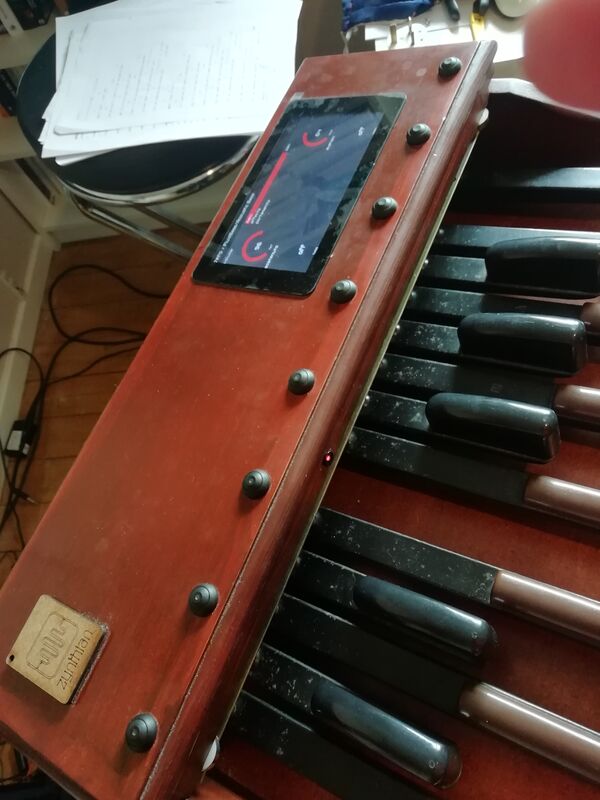
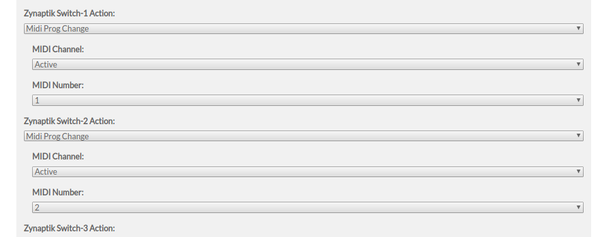
8 Eight digital input switches selecting Program Change events
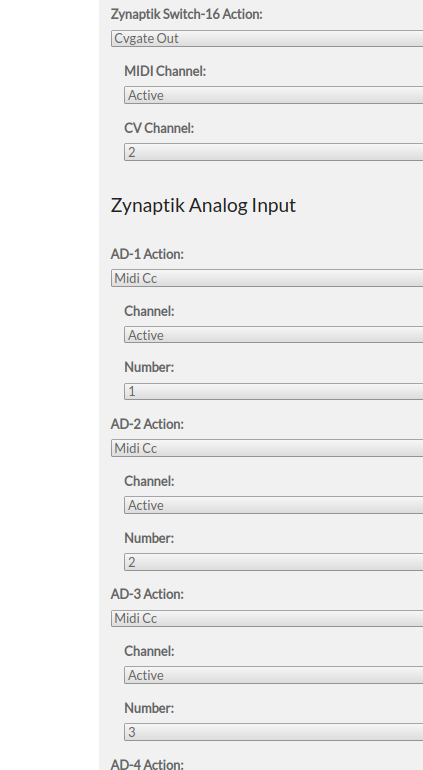
Eight Momentary switches can be connected to the Zynaptik Digital INput pins and allocated to generate Programme Change Events.


