Difference between revisions of "Accessing Zynthian from your computer"
| (68 intermediate revisions by 5 users not shown) | |||
| Line 1: | Line 1: | ||
| − | == | + | == Network Connection == |
| − | The | + | The easiest way to connect your Zynthian is to use the Ethernet RJ45 connector with a CAT-5 cable to connect your unit to your local network (DHCP) or directly to your computer (Ethernet to Ethernet, aka link-local). Your Zynthian box uses the link-local name "zynthian.local" and the filesystem can be accessed with '''sftp''' and '''scp''' (If you are using Windows, use '''Winscp''' - free software needed to communicate using this Internet protocol). |
| − | |||
| − | user= | + | You can also login with '''ssh''' to access the Linux console. see [[Command_Line_User_Guide]] (use '''PuTTY''' for Windows). The username and default password is: |
| + | |||
| + | user=root | ||
password=raspberry | password=raspberry | ||
| − | + | If the link-local address (zynthian.local) is not found, make sure that the link-local feature is enabled in your system. Sometimes it's disabled and link-local names are not recognized (windows). If you can't manage to get link-local names to work, you can use the Zynthian's IP address. The zynthian's IP address can be found int the UI's "Admin->Network Info" menu, and it's also printed on the zynthian's error screen. See: [[Finding your IP address]] | |
| + | |||
| + | == Accessing the Web Configuration Tool == | ||
| + | |||
| + | You can access web configuration tool using the web browser from your computer: | ||
| + | |||
| + | # Connect your Zynthian to your local network using the ethernet connector (RJ45) or directly to your computer (Ethernet to Ethernet) | ||
| + | # Open the browser in your computer and type in the address bar: | ||
| + | |||
| + | http://zynthian.local (or the IP address of your Zynthian) | ||
| + | |||
| + | {{NoteBox|If zynthian.local does not work, see [[Finding your IP address]]}} | ||
| + | |||
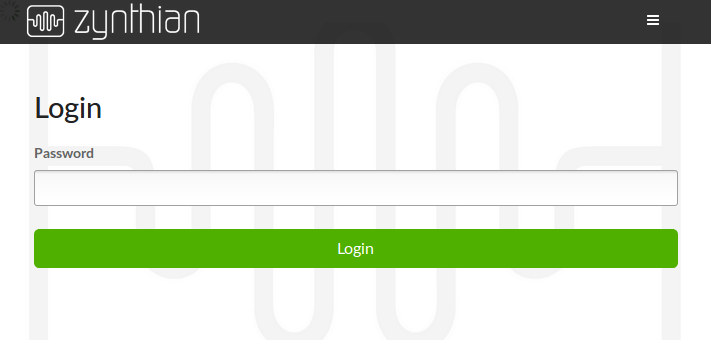
| + | The web config tool will load and ask for the admin password. The default password is "raspberry". | ||
| + | |||
| + | [[File:zynthian_webconf_login.png]] | ||
| + | |||
| + | Here are the details on using the Web configuration tool: [[Configuration_Users_Guide]] | ||
| + | |||
| + | == Wifi Configuration == | ||
| + | |||
| + | Wifi credentials can be set via the web config tool: System - Wifi - Add Network. Wifi must be enabled in the Zynthian Gui: press the Back button until you are in the Admin menu. Then select 'Start WIFI'. | ||
| + | |||
| + | == Accessing the MOD-UI web interface == | ||
| + | |||
| + | You can access the MOD-UI web interface using the web browser from your computer: | ||
| + | |||
| + | * Create a Special Layer with a "MOD-UI" engine from the Zynthian's UI | ||
| + | * Connect your Zynthian to your local network using the ethernet connector (RJ45) or directly to your computer (ethernet to ethernet) | ||
| + | * Open the browser in your computer and navigate to: | ||
| + | |||
| + | zynthian.local:8888 | ||
| + | |||
| + | The MOD-UI webpage should appear. | ||
| + | |||
| + | When a MOD-UI layer exist, this link is also accessible from the webconf's software menu (reload webconf after creating the layer). | ||
| + | |||
| + | If the link-local address (zynthian.local) is not found, test that the link-local feature is enabled in your system. Sometimes is disabled and local names are not recognized. You can use the zynthian's IP address instead. See: [[Finding your IP address]] | ||
| + | |||
| + | == Opening Synth Engine Native GUIs on your Computer == | ||
| + | |||
| + | Some engines have a native GUI that can be accessed from your desktop/laptop computer. There are several methods for achieving this: | ||
| + | |||
| + | ====X11 Server==== | ||
| + | |||
| + | To use this method, you need an X11 Server running on your desktop/laptop computer. | ||
| + | |||
| + | * If you use Linux, you probably already have it, so you don't need to do anything special. Simply login into your zynthian using the ssh with the "-Y" option for forwarding the X session: | ||
| + | |||
| + | $ ssh -Y root@zynthian.local | ||
| + | |||
| + | * If you are a Mac user, you should install and enable the '''XQuartz''' package. After that, login into your zynthian with the same command. | ||
| + | |||
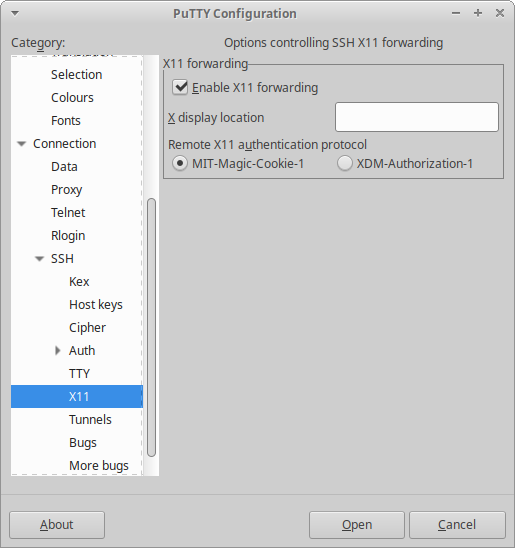
| + | * If you are a Windows user, then you should install the '''XMing''' package and login into your zynthian using Putty with the "X11 forwarding" option enabled. | ||
| + | |||
| + | [[File:Putty-on-zynth-X11.png]] | ||
| + | |||
| + | ====VNC==== | ||
| + | |||
| + | You could also use VNC, although it's a bit complex: | ||
| + | |||
| + | * Login into your zynthian box and enter: | ||
| + | |||
| + | # apt-get install vnc4server blackbox | ||
| + | # pico ~/.vncrc | ||
| + | |||
| + | * enter this line to set the desktop size: | ||
| + | |||
| + | $geometry = “2048x1600”; | ||
| + | |||
| + | * start the vnc server: | ||
| + | |||
| + | # vnc4server | ||
| + | |||
| + | * Connect to the vnc server using (e.g.) Windows TightVNC viewer. | ||
| − | + | ====RealVNC==== | |
| − | + | [[File:VNCReal_Zynthians.png]] | |
| − | + | [[File:Vncreal-setup.png]] | |
| − | |||
| − | + | [[File:Realvnc-step2.png]] | |
| − | + | ||
| − | + | [[File:Realvnc-step3.png]] | |
| − | + | ||
| − | + | [[File:Realvnc-step4.png]] | |
| + | |||
| + | [[File:Realvnc-step5.png]] | ||
| + | |||
| + | [[File:Realvnc-help.png]] | ||
| + | |||
| + | ====Supported Engines with Native GUI==== | ||
| + | |||
| + | Currently ''ZynAddSubFX'', ''Aeolus'', ''Pianoteq'' and ''Pure Data'' have support for remotely displaying their native GUIs, which is launched automatically when layer is created. Other GUI software can be launched, like ''qjackctl'' or a virtual MIDI keyboard for testing. | ||
| + | |||
| + | {{NoteBox|Using an ethernet-to-ethernet (cable) connection will reduce remote GUI latency and improve usability.}} | ||
| + | |||
| + | == Uploading your presets/soundfonts to Zynthian == | ||
| + | |||
| + | The easiest way of getting your presets & soundfonts inside your zynthian is by using the webconf's preset manager: | ||
| + | |||
| + | http://zynthian.local/lib-presets | ||
| + | |||
| + | From there you manage your preset & soundfont libraries: renaming, deleting, and uploading, including automatic conversion from some native formats: | ||
| + | |||
| + | * DX7 SysEX files | ||
| + | * OBXd FXB files | ||
| + | * synthv1 native format | ||
| + | * padthv1 native format | ||
| + | |||
| + | If if this doesn't work for you, or you prefer to do it by hand, you can copy your presets/soundfonts/pedalboards into the next folder: | ||
| + | |||
| + | /zynthian/zynthian-my-data | ||
| + | |||
| + | This is the subfolder structure: | ||
| + | |||
| + | + '''presets''' | ||
| + | + zynaddsubfx | ||
| + | + puredata | ||
| + | + pianoteq | ||
| + | + lv2 | ||
| + | + mod-ui | ||
| + | + '''soundfonts''' | ||
| + | + '''sf2''' | ||
| + | + bank-1.sf2 | ||
| + | + ... | ||
| + | + bank-n.sf2 | ||
| + | + '''sfz''' | ||
| + | + bank-1 | ||
| + | + sfz-bundle1 | ||
| + | + ... | ||
| + | + sfz-bundle2 | ||
| + | + ... | ||
| + | + bank-n | ||
| + | + '''gig''' | ||
| + | + bank-1 | ||
| + | + instrument-1.gig | ||
| + | + ... | ||
| + | + instrument-n.gig | ||
| + | + ... | ||
| + | + bank-n | ||
| + | + '''snapshots''' | ||
| + | + '''capture''' | ||
| + | |||
| + | SFZ and GIG soundfonts are used with LinuxSampler. SF2 soundfonts are used with FluidSynth. SFZ and GIG soundfonts must be organized in 'bank' subfolders. SF2 files are considered "banks" by itself. | ||
| + | |||
| + | If you have doubts of how to store your data, take a look in this directory: | ||
| + | |||
| + | /zynthian/zynthian-data | ||
| − | + | Here you will find the same folder structure, and could help you to understand. | |
| − | |||
| − | + | Also it's interesting: | |
| − | + | /zynthian/config | |
| − | + | If you are really interested, you could, for instance, edit the setBfree configuration, and change the CC assignments, etc. | |
| − | + | {{WarningBox|If you add or change something inside the ''zynthian-data'' folder, your changes will be lost on the next update, or, in a worst case scenario, you could break the update system.}} | |
| − | + | == OSC == | |
| − | + | Open Sound Control (OSC) is a protocol for networking sound synthesizers, computers, and other multimedia devices for purposes such as musical performance or show control. Zynthian implements OSC in various ways. | |
| − | + | ==== CUIA ==== | |
| + | The CUIA features described in the [[Zynthian_UI_Users_Guide#CUIA:_Callable_UI_Actions|user's guide]] can be accessed using OSC on port UDP 1370. The OSC base path for CUIA messages is | ||
| + | /cuia | ||
| − | + | Example: | |
| − | + | /cuia/reboot | |
| − | |||
| − | |||
| − | |||
| − | |||
| − | |||
| − | |||
| − | + | Note: CUIA paths are case insensitive, e.g. | |
| + | /cuia/reboot | ||
| − | + | is interpreted the same as | |
| + | /CUIA/REBOOT | ||
| − | ''' | + | ==== TouchOSC ==== |
| − | + | The TouchOSC protocol is supported if the option is enabled in the Zynthian admin menu. This accepts OSC on port 12101 using UDP datagrams and includes raw MIDI data interpretation on OSC path | |
| + | /midi | ||
| + | This path accepts an OSC MIDI type message. An example Python script to send MIDI note on / off messages: | ||
| + | import liblo | ||
| + | import time | ||
| + | |||
| + | cmdNoteOn = 0x90 | ||
| + | cmdNoteOff = 0x80 | ||
| + | note = 60 | ||
| + | vel = 100 | ||
| + | |||
| + | liblo.send(('zynthian.local', 12101), "/midi", ('m', (vel,note,cmdNoteOn,0))) | ||
| + | time.sleep(1) | ||
| + | liblo.send(('zynthian.local', 12101), "/midi", ('m', (0,note,cmdNoteOff,0))) | ||
Revision as of 12:23, 4 May 2020
1 Network Connection
The easiest way to connect your Zynthian is to use the Ethernet RJ45 connector with a CAT-5 cable to connect your unit to your local network (DHCP) or directly to your computer (Ethernet to Ethernet, aka link-local). Your Zynthian box uses the link-local name "zynthian.local" and the filesystem can be accessed with sftp and scp (If you are using Windows, use Winscp - free software needed to communicate using this Internet protocol).
You can also login with ssh to access the Linux console. see Command_Line_User_Guide (use PuTTY for Windows). The username and default password is:
user=root
password=raspberry
If the link-local address (zynthian.local) is not found, make sure that the link-local feature is enabled in your system. Sometimes it's disabled and link-local names are not recognized (windows). If you can't manage to get link-local names to work, you can use the Zynthian's IP address. The zynthian's IP address can be found int the UI's "Admin->Network Info" menu, and it's also printed on the zynthian's error screen. See: Finding your IP address
2 Accessing the Web Configuration Tool
You can access web configuration tool using the web browser from your computer:
- Connect your Zynthian to your local network using the ethernet connector (RJ45) or directly to your computer (Ethernet to Ethernet)
- Open the browser in your computer and type in the address bar:
http://zynthian.local (or the IP address of your Zynthian)
Note:
If zynthian.local does not work, see Finding your IP address
The web config tool will load and ask for the admin password. The default password is "raspberry".
Here are the details on using the Web configuration tool: Configuration_Users_Guide
3 Wifi Configuration
Wifi credentials can be set via the web config tool: System - Wifi - Add Network. Wifi must be enabled in the Zynthian Gui: press the Back button until you are in the Admin menu. Then select 'Start WIFI'.
4 Accessing the MOD-UI web interface
You can access the MOD-UI web interface using the web browser from your computer:
- Create a Special Layer with a "MOD-UI" engine from the Zynthian's UI
- Connect your Zynthian to your local network using the ethernet connector (RJ45) or directly to your computer (ethernet to ethernet)
- Open the browser in your computer and navigate to:
zynthian.local:8888
The MOD-UI webpage should appear.
When a MOD-UI layer exist, this link is also accessible from the webconf's software menu (reload webconf after creating the layer).
If the link-local address (zynthian.local) is not found, test that the link-local feature is enabled in your system. Sometimes is disabled and local names are not recognized. You can use the zynthian's IP address instead. See: Finding your IP address
5 Opening Synth Engine Native GUIs on your Computer
Some engines have a native GUI that can be accessed from your desktop/laptop computer. There are several methods for achieving this:
5.1 X11 Server
To use this method, you need an X11 Server running on your desktop/laptop computer.
- If you use Linux, you probably already have it, so you don't need to do anything special. Simply login into your zynthian using the ssh with the "-Y" option for forwarding the X session:
$ ssh -Y root@zynthian.local
- If you are a Mac user, you should install and enable the XQuartz package. After that, login into your zynthian with the same command.
- If you are a Windows user, then you should install the XMing package and login into your zynthian using Putty with the "X11 forwarding" option enabled.
5.2 VNC
You could also use VNC, although it's a bit complex:
- Login into your zynthian box and enter:
  # apt-get install vnc4server blackbox
  # pico ~/.vncrc
- enter this line to set the desktop size:
$geometry = “2048x1600”;
- start the vnc server:
# vnc4server
- Connect to the vnc server using (e.g.) Windows TightVNC viewer.
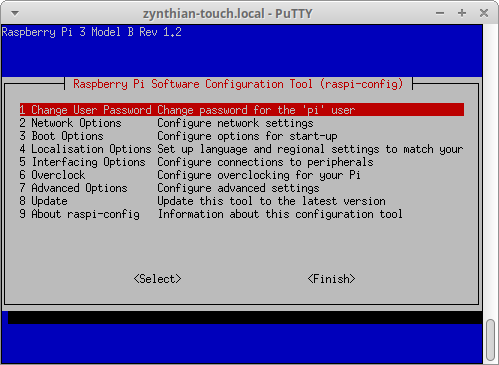
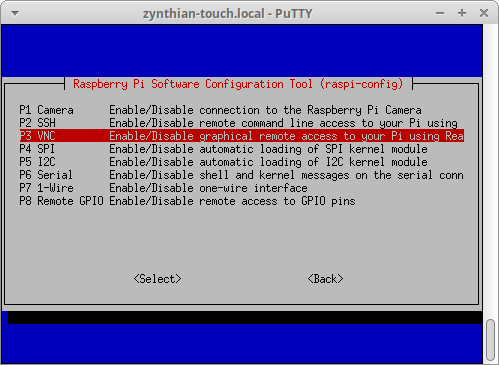
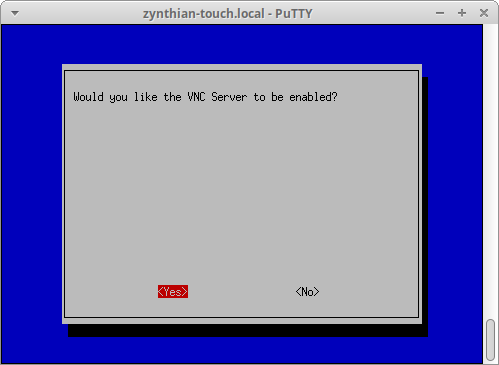
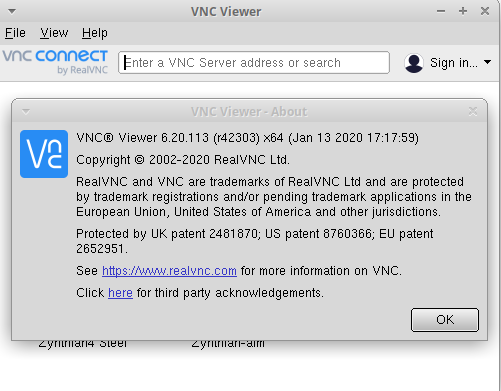
5.3 RealVNC
5.4 Supported Engines with Native GUI
Currently ZynAddSubFX, Aeolus, Pianoteq and Pure Data have support for remotely displaying their native GUIs, which is launched automatically when layer is created. Other GUI software can be launched, like qjackctl or a virtual MIDI keyboard for testing.
Note:
Using an ethernet-to-ethernet (cable) connection will reduce remote GUI latency and improve usability.
6 Uploading your presets/soundfonts to Zynthian
The easiest way of getting your presets & soundfonts inside your zynthian is by using the webconf's preset manager:
http://zynthian.local/lib-presets
From there you manage your preset & soundfont libraries: renaming, deleting, and uploading, including automatic conversion from some native formats:
- DX7 SysEX files
- OBXd FXB files
- synthv1 native format
- padthv1 native format
If if this doesn't work for you, or you prefer to do it by hand, you can copy your presets/soundfonts/pedalboards into the next folder:
/zynthian/zynthian-my-data
This is the subfolder structure:
+ presets
 + zynaddsubfx
 + puredata
 + pianoteq
 + lv2
 + mod-ui
+ soundfonts
 + sf2
   + bank-1.sf2
   + ...
   + bank-n.sf2
 + sfz
   + bank-1
     + sfz-bundle1
     + ...
     + sfz-bundle2
   + ...
   + bank-n
 + gig
   + bank-1
     + instrument-1.gig
     + ...
     + instrument-n.gig
   + ...
   + bank-n
+ snapshots
+ capture
SFZ and GIG soundfonts are used with LinuxSampler. SF2 soundfonts are used with FluidSynth. SFZ and GIG soundfonts must be organized in 'bank' subfolders. SF2 files are considered "banks" by itself.
If you have doubts of how to store your data, take a look in this directory:
/zynthian/zynthian-data
Here you will find the same folder structure, and could help you to understand.
Also it's interesting:
/zynthian/config
If you are really interested, you could, for instance, edit the setBfree configuration, and change the CC assignments, etc.
WARNING!!
If you add or change something inside the zynthian-data folder, your changes will be lost on the next update, or, in a worst case scenario, you could break the update system.
7 OSC
Open Sound Control (OSC) is a protocol for networking sound synthesizers, computers, and other multimedia devices for purposes such as musical performance or show control. Zynthian implements OSC in various ways.
7.1 CUIA
The CUIA features described in the user's guide can be accessed using OSC on port UDP 1370. The OSC base path for CUIA messages is
/cuia
Example:
/cuia/reboot
Note: CUIA paths are case insensitive, e.g.
/cuia/reboot
is interpreted the same as
/CUIA/REBOOT
7.2 TouchOSC
The TouchOSC protocol is supported if the option is enabled in the Zynthian admin menu. This accepts OSC on port 12101 using UDP datagrams and includes raw MIDI data interpretation on OSC path
/midi
This path accepts an OSC MIDI type message. An example Python script to send MIDI note on / off messages:
import liblo
import time

cmdNoteOn = 0x90
cmdNoteOff = 0x80
note = 60
vel = 100

liblo.send(('zynthian.local', 12101), "/midi", ('m', (vel,note,cmdNoteOn,0)))
time.sleep(1)
liblo.send(('zynthian.local', 12101), "/midi", ('m', (0,note,cmdNoteOff,0)))
